
A few weeks ago I stumbled upon the game engine Godot and I decided to give it a try by learning how to use it for creating a 2D platform game. This blog post contains a walk-through of the different parts of this endeavour. The source code for my game is completely free and is available from GitHub so just go ahead and download and experiment with it as you like.
About Godot
Godot is an open-source game engine with a light-weight development environment that runs on OS X, Windows and Linux. The games can be deployed to the mentioned OS:es and also to iOS, Android and HTML (with WebAssembly and WebGL). I’m using Godot 3.0 that was released in late January 2018. The engine supports both 2D and 3D development but the focus in this tutorial is solely on 2D. For scripting the game logic, Godot supports several different languages (among them C# with mono in Godot 3.0). I use the default, Python-like, GDScript.
There are so many things I like about Godot. It’s free, open-source, multi-platform for development, multi-target for deployment and very easy to use. The main benefit for me is that Godot allows for building the game objects in different scenes which makes development easier and it also encourages re-use of the game objects.
As the stable version of Godot 3.0 is quite new, there are not many tutorials available yet. There are many guides on Godot 2.0, but as much has changed for Godot 3.0 all 2.0-information is not applicable to the new version.
Game play
The goal for this project was to learn more about Godot and GDScript-programming, so I have not invested much in the actual game play. In fact it is rather rudimentary:
- The player should capture all items on each level…
- …while avoiding being battered by the enemies
- If the player’s health goes down to 0% it is game over
- If the player captures all items, the player is promoted to the next level
- For bonus points, the player can capture gems hidden in boxes and jump on enemies
Scenes, nodes and game objects
Games are built with scenes in Godot. A scene contains a tree of nodes that in turn can be other scenes. Thanks to Godot’s scene system, the game objects can be mapped to scenes that can be developed and tested separately.
Nodes for a scene tree can be defined in the Godot editor but you can also instantiate nodes from code which is very useful when you need to spawn many objects with random parameters.
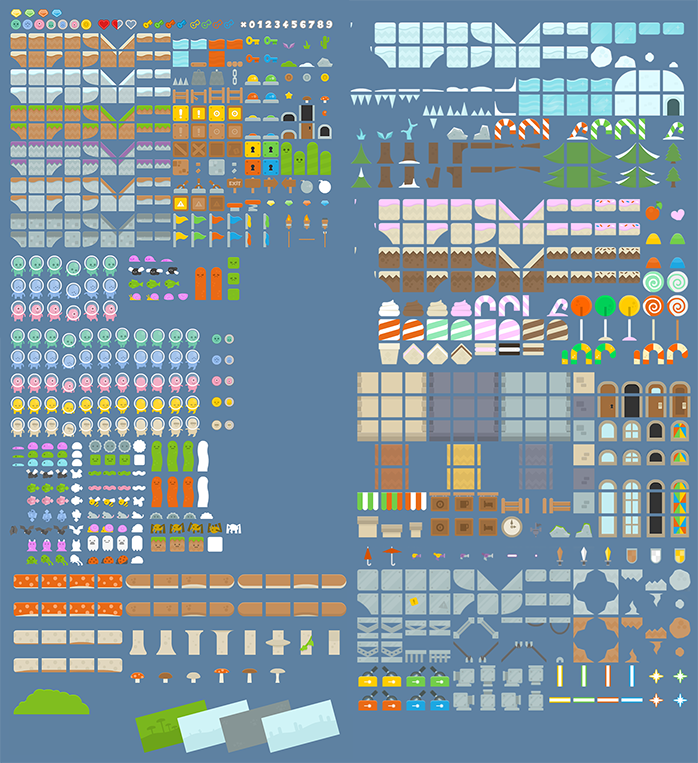
Graphic assets
To get some inspiration for a 2D platform game I browsed opengameart.org and found some nice open-source art by kenney. I use this public domain package for my game (with some slight modifications):
The player character
I started out by creating the player character. This is implemented in a separate scene (stored in the player.tscn file). The player is a KinematicBody2D object. This object type handles collisions with other objects automatically and it also sees to that the object is moved to a non-collision state after a collision. For custom detection on when a KinematicBody2D object overlaps another object you need do some coding. More on this further down in this post.

The player scene has an animated sprite with a Particle2D object that creates a visual effect when the object is hit. The CollisionPolygon2D object covers the essential part of the object for collision detection. The object also has some AudioStreamPlayers for sound effects and two timers that triggers the the sound effects and animations when the object has been hit.
The player scene has a Camera2D object. This makes it possible to scroll the view as the character moves.
Using a TileMap for level building
For rapid development of the core of 2D levels, a TileMap can be used. A TileMap is a node where you can draw with tiles from a TileSet.
Creating a tile set
A tile set can be created by first creating a separate scene where you add sprites with collision nodes. Then you can export this as a tile set resource that can be referenced from a TileMap.

Using a tile set
Create a new scene that contains a TileMap object. On this object you can link to your created tile set resource file. After this you can draw with your tiles. If you set the grid size of the TileMap cells to map your tile size, they will align properly in the editor.

Items
Spawning items
In my game items are objects that can be collected by the player for gaining points. On the first level, the items are stars. These are implemented as simple sprites. As I don’t want to manually instantiate a sprite in the editor for each item, I came up with a this approach instead:
- Draw Path2D points on the level
- When the level is loaded, create a Star instance for each point in the Path2D-object
This allows me to easily mark on the TileMap where each star should be placed without having to manually create a sprite for each Star. The level loading code looks like this:
This file contains hidden or bidirectional Unicode text that may be interpreted or compiled differently than what appears below. To review, open the file in an editor that reveals hidden Unicode characters.
Learn more about bidirectional Unicode characters
| extends Node2D | |
| export (PackedScene) var Star | |
| export (int) var total_stars = 0 | |
| export (int) var stars_found = 0 | |
| func _ready(): | |
| var pos_curve = $ItemPositions.get_curve() | |
| total_stars = pos_curve.get_point_count() | |
| for i in range(0, total_stars): | |
| var star = Star.instance() | |
| add_child(star) | |
| star.position = pos_curve.get_point_position(i) |
And the Path2D path in Godot looks like this:

Detecting item collisions in code
The player object is a KinematicBody2D object and I have not found a good way to do custom collision detection with other objects from within KinematicBody2D. Thus, I go the other way around: From a collision between my player object and an item, I let the item send a notification about the collision. This is possible because the items are Area2D objects that implements a body_entered event.
The items (Stars on level 1) are instantiated from a star scene. The star scene is an Area2D object that holds a sprite object for the star image and CollisionPolygon2D object that defines the boundaries for the star:

When a star collides with a an object, it checks if it is a player object, and if so, it sends a signal that a star has been taken and then removes itself from the game (with queue_free()):
This file contains hidden or bidirectional Unicode text that may be interpreted or compiled differently than what appears below. To review, open the file in an editor that reveals hidden Unicode characters.
Learn more about bidirectional Unicode characters
| extends Area2D | |
| signal star_taken | |
| func _on_Area2D_body_entered( body ): | |
| if (not body.get("is_player") == null): | |
| $CollisionPolygon2D.disabled = true | |
| hide() | |
| emit_signal("star_taken") | |
| queue_free() |
The level scene is updated to handle the star_taken signal. The level code routes the signal so that it can be handled by the main scene (for counting the score/points).
This file contains hidden or bidirectional Unicode text that may be interpreted or compiled differently than what appears below. To review, open the file in an editor that reveals hidden Unicode characters.
Learn more about bidirectional Unicode characters
| extends Node2D | |
| export (PackedScene) var Star | |
| signal star_was_taken | |
| export (int) var total_stars = 0 | |
| export (int) var stars_found = 0 | |
| func _ready(): | |
| var pos_curve = $ItemPositions.get_curve() | |
| total_stars = pos_curve.get_point_count() | |
| for i in range(0, total_stars): | |
| var star = Star.instance() | |
| add_child(star) | |
| star.position = pos_curve.get_point_position(i) | |
| star.connect("star_taken", self, "on_star_taken") | |
| func on_star_taken(): | |
| stars_found += 1 | |
| emit_signal("star_was_taken") | |
Enemies
The enemies are implemented in a similar way as the items. I draw a Path2D points on the level but I want the enemy objects to follow the path between the points. For this purpose the Path2D object has a PathFollow2D sub item. The PathFollow2D allows for getting an arbitrary offset position along the Path2D curve and these positions are used for moving the enemies around the path.

The level scene code spawns 10 bats (enemies) and sends the PathFollow2D object to each object and listens to “player_hit” signals from each bat/enemy object:
This file contains hidden or bidirectional Unicode text that may be interpreted or compiled differently than what appears below. To review, open the file in an editor that reveals hidden Unicode characters.
Learn more about bidirectional Unicode characters
| extends Node2D | |
| export (PackedScene) var Bat | |
| func _ready(): | |
| for i in range(0,10): | |
| var bat = Bat.instance() | |
| bat.path = $BatPath/PathFollow2D | |
| bat.connect("player_hit", self, "on_player_hit") | |
| add_child(bat) |
A bat object is an Area2D object with an animated sprite and a CollisionShape2D object:

Each bat object gets the PathFollow2D (the path variable) from the level object and uses a random start position along the curve. The speed and direction of each bat is also random. To get the sprite to point in the correct direction, the sprite is flipped depending on if it moves to the right or to the left:
This file contains hidden or bidirectional Unicode text that may be interpreted or compiled differently than what appears below. To review, open the file in an editor that reveals hidden Unicode characters.
Learn more about bidirectional Unicode characters
| extends Area2D | |
| signal player_hit | |
| var path = null | |
| var prevX = 0 | |
| var pathIdx = 0 | |
| var speed = 0 | |
| var direction = 0 | |
| func _ready(): | |
| pathIdx = randi() % 10000 | |
| speed = randi() % 3 + 1 | |
| direction = randi() % 2 | |
| func _process(delta): | |
| if position.x > prevX: | |
| $AnimatedSprite.flip_h = true | |
| else: | |
| $AnimatedSprite.flip_h = false | |
| prevX = position.x | |
| if not path == null: | |
| path.set_offset(pathIdx) | |
| position = path.position | |
| if direction == 0: | |
| pathIdx += speed | |
| else: | |
| pathIdx -= speed | |
| func _on_Bat_body_entered( body ): | |
| if (not body.get("is_player") == null): | |
| emit_signal("player_hit") |
Detecting when on a ladder
In the tile map there is a particular tile that should have special treatment – the ladder. The player should not collide with this tile, but when the player is on the ladder, the player character should have a special animation and be able to climb up and down. Also in this state, the player object should not be affected by gravity.

To achieve this I define the ladder tile in the tile set to be a sprite without StaticBody2D– and collision nodes:

In the script for the player scene I check if there is a tile map node available as parent. If so, I convert the player’s position to a tile map position (with world_to_map) and check what tile exists on that position. If it is a ladder tile, the player character is on the ladder.
This file contains hidden or bidirectional Unicode text that may be interpreted or compiled differently than what appears below. To review, open the file in an editor that reveals hidden Unicode characters.
Learn more about bidirectional Unicode characters
| var on_ladder = false | |
| func _physics_process(delta): | |
| var tilemap = get_parent().get_node("TileMap") | |
| if not tilemap == null: | |
| var map_pos = tilemap.world_to_map(position) | |
| var id = tilemap.get_cellv(map_pos) | |
| if id > -1: | |
| if tilemap.get_tileset().tile_get_name(id) == "ladder": | |
| on_ladder = true | |
| else: | |
| on_ladder = false | |
| else: | |
| on_ladder = false |
Jumping on enemies and open boxes with gems
I’ve added so that the player can incapacitate the enemies by jumping on top of them. Another extra feature is that you can open special box tiles by bumping the player’s head into them. This reveals diamond gems for extra points. You don’t need to collect all gems to complete a level though. Here is a video on how it looks:
HUD
The HUD (Heads Up Display) shows the current score and level, health and level complete status. This is implemented with Godot’s label control objects that are wrapped within split containers. The HUD controls has a CanvasLayer parent which makes the controls stick on the same position on the screen even though the rest of the game world is scrolling.
Menu
When the game is running you can press ESC for pause. This shows a menu where you can resume, restart and quit. There are also menu options available when you reach the states Level complete, Game over and Game complete.
Sounds
I created short background tracks with Logic and Absynth that I exported to ogg format for each game level. I also recorded some sounds for the player character (also exported as ogg files). The sounds are handled by AudioStreamPlayer objects and are triggered at different times within the game.
Parallax background
To get a more vivid background I added a ParallaxBackground object with a ParallaxLayer sub node with a tiled background.
Conclusions
Godot is great!! Love it! I still have much to learn but I am very eager to continue working with this game engine.
The source for this game can be downloaded from GitHub: https://github.com/LarsBergqvist/star_hunter_game
I’ve also uploaded a pre-release (currently only for OSX) with 3 levels that you can download from the release page:
https://github.com/LarsBergqvist/star_hunter_game/releases

Check out this tutorial as well, very in depth also talks about sound : http://generalistprogrammer.com/godot/godot-2d-platformer-tutorial/
LikeLike