
In part 2 of this three-part tutorial I will explain how the Angular frontend is designed for the “Locations in Your Pocket” application. The Angular application can be configured to use in-memory fake data so you can run this app without a backend for testing purposes.
All code for the complete project is available from GitHub: https://github.com/LarsBergqvist/loc-poc
The other parts of this tutorial are:
- Part 1 (an overview of the project)
- Part 3 (the REST API and database implementation with .NET Core)
Overview
The startup view of the Angular application shows a list of existing locations/places. You can add a new location that by default get your current position from the browser (if you allow it). The position is shown on a map and you can change the position by clicking/tapping on a different place on the map. The longitude and latitude values are also available in editable controls. You can give the location a name and a description.

About PrimeNG
For getting a quicker start with the look-and-feel of the application, I use PrimeNG as a UI framework. There are other good UI frameworks for Angular but I opted for using PrimeNG as I am well acquainted with it from previous projects.
Testing the default behavior
The default configuration for the application uses in-memory mock data and have the map visualization turned off, so you can try out the frontend without the REST API and without having a Google API key. There are a couple of pre-reqs though:
- Git must be installed (if you use Git to get the code from GitHub)
- NodeJS must be installed (version >= 10.9.0 is required by Angular)
- Yarn must be installed (you can use npm as package manager instead, but I prefer yarn and will use it in my examples)
Get the code and install the dependencies
git clone https://github.com/LarsBergqvist/loc-poc
cd loc-poc/Clients/LocPocAngular
yarn install
Start the application
yarn startSSL
Now you should be able to open the application in a browser with https://localhost:4300 (you will get a warning in the browser about the certificate as it has not been verified by a third-party authority)
There is a set of in-memory locations listed. You can click on an item to open the details where you can modify the properties or delete the location. As the data is stored in-memory, the location item collection will be reset if you refresh your browser.
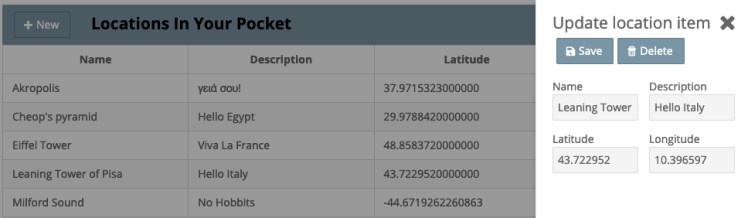
The locations list is rendered differently depending on the screen size. With a large screen you get a table with headers and columns, but with small screens (e.g. from a mobile phone) you get a list of item cards.

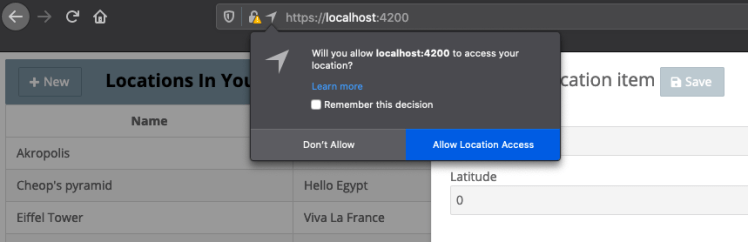
In the locations list you can press the New button for creating a new location. This will fetch your current position from the browser (if you allow it). Note that if you run the app from a mobile browser, you need to turn on location access for the web browser app that you are using).
The Angular application structure
Component structure
The application is made up of these Angular components:
- AppComponent – the main component that aggregates the other components
- AppBarComponent – The appbar/toolbar at the top of the page
- LocationsListComponent – Shows a list of the stored location items
- LocationDetailsComponent – An overlay sidebar that shows the details of a location item. Used when adding a new location and when updating an existing item.
- MapComponent – Used by LocationDetailsComponent for showing the position in a Google Maps view.
- ToastComponent – A PrimeNG overlay component for showing notifications to the user (error- and success messages).

Services
The application has a bunch of custom services:
- AppConfigService – Holds the application configuration (different settings for the app)
- GoogleMapsService – Loads the google maps api object when the application is started
- HttpInterceptorService – A middle-ware service that handles http errors in one single place.
- LocationsService – Provides access to the Location item collection. There is a real implementation that performs actual http requests to the backend API and a mock version that uses in-memory fake data. What version is used is determined by app-config.json.
- LoggingService – A simple logging service so that all logging statements are routed to a single implementation
- MessageBrokerService – Sends async messages to subscribers. This makes it possible to have less code coupling between different parts in the application.
Application configuration
There is a configuration file for the application that by default looks like this:
This file contains hidden or bidirectional Unicode text that may be interpreted or compiled differently than what appears below. To review, open the file in an editor that reveals hidden Unicode characters.
Learn more about bidirectional Unicode characters
| { | |
| "apiUrl": "https://localhost", | |
| "apiPort": "5001", | |
| "useFakeData": true, | |
| "useMap": false, | |
| "googleAPIKey": "YOUR-API-KEY" | |
| } |
- apiUrl and apiPort – define how to access the backend REST API
- useFakeData – if set to true, the fake in-memory data is used. If set to false, http requests to the backend is used.
- useMap – if set to false, no map is shown in the details view. If set to true, a Google Maps view is shown. To be able to use the Google Maps view, a Google API key is required.
- googleAPIKey – this is the API key to your Google Maps resource. See below.
Activating the map view
Get the Google API key
You need a Google API key to use Google Maps from the application. Using Google Maps is currently free up to a certain amount of calls per month. See https://cloud.google.com/maps-platform/pricing. You can sign-up for the Google Cloud Platform and start using the Google Maps API for free for your testing purposes.
When logged into the Google Cloud Platform, go to the Console and select Credentials in the API & Services menu. Create a new API key:
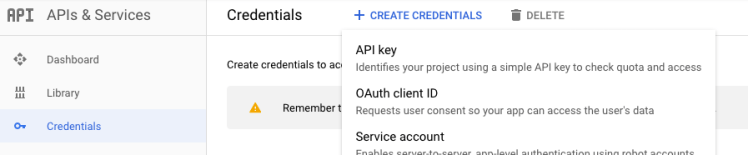
Your API key will be available for copying from the API Keys list:

You can restrict the usage of this key to certain domains so you can lock it down to your application Url. This is important if you are publishing your application as the key will be visible in the html or the JavaScript and any user can copy the key and use it elsewhere if it is not restricted to your application.
Modify the application settings
To activate the map you have to set the useMap property to true and set your Google API key as the googleAPIKey property in app-config.json. See example below (with faked apiKey);
This file contains hidden or bidirectional Unicode text that may be interpreted or compiled differently than what appears below. To review, open the file in an editor that reveals hidden Unicode characters.
Learn more about bidirectional Unicode characters
| { | |
| "apiUrl": "https://localhost", | |
| "apiPort": "5001", | |
| "useFakeData": true, | |
| "useMap": true, | |
| "googleAPIKey": "ABzaDuAQbFxSalDaWfIAB7DEZAh730AFGGGlpg" | |
| } |
Implementation details
The geolocation API
The browser’s geolocation API is used for fetching the current position. When the user presses the New button, the LocationDetailsComponent gets a message from the MessageBrokerService. It creates a new empty Location object, shows the dialog in AddNewMode and requests to get the current position from the browser asynchronously.
This file contains hidden or bidirectional Unicode text that may be interpreted or compiled differently than what appears below. To review, open the file in an editor that reveals hidden Unicode characters.
Learn more about bidirectional Unicode characters
| async ngOnInit() { | |
| const messages = this.messageBroker.getMessage(); | |
| messages.pipe(filter(message => message instanceof AddNewLocationMessage)) | |
| .subscribe((message: AddNewLocationMessage) => { | |
| if (message) { | |
| this.createDefaultLocation(); | |
| this.editMode = LocationEditMode.AddNew; | |
| this.isVisible = true; | |
| this.setCurrentPosition(); | |
| } | |
| }); | |
| } | |
| private async setCurrentPosition() { | |
| navigator.geolocation.getCurrentPosition(position => { | |
| this.location = { | |
| Id: this.location.Id, | |
| Name: this.location.Name, | |
| Description: this.location.Description, | |
| Latitude: position.coords.latitude, | |
| Longitude: position.coords.longitude | |
| }; | |
| }, error => { | |
| this.logging.logError(error.message); | |
| this.messageBroker.sendMessage(new ErrorOccurredMessage(error.message)); | |
| }); | |
| } |
The user will get prompted to allow the app to access the location information:
When a position arrives from the browser, a new location object is created with the new position (so that the property binding works correctly with sub-components) and the latitude/longitude input fields are updated as well as the location marker in the map.
APP_INITIALIZER: Read configuration and load the google maps api
The google maps api object needs to be available globally on the page for you to be able to use the Google Maps JavaScript API. The standard way of achieving this is to provide a <script>-tag in index.html with https://maps.googleapis.com/maps/api + your API key. This does not fit Angular and configuration files well, so I’m using the load-google-maps-api package to load the google api object with code.
However, the google maps api object needs to be loaded during application initialization. I also need to load app-config.json during app init (so I know if maps should be used and can get the googleAPIKey from the configuration). This can be achieved by using an APP_INITIALIZER provider in app.module.ts:
This file contains hidden or bidirectional Unicode text that may be interpreted or compiled differently than what appears below. To review, open the file in an editor that reveals hidden Unicode characters.
Learn more about bidirectional Unicode characters
| export function appConfigInit(configService: AppConfigService, | |
| googleMapService: GoogleMapsService, logging: LoggingService) { | |
| // Load the configuration and init google api if maps should be used | |
| return () => { | |
| return new Promise((resolve) => { | |
| configService.load().then(() => { | |
| if (configService.useMap) { | |
| logging.logInfo('Use map'); | |
| googleMapService.load(configService.googleAPIKey).then(() => { | |
| resolve(); | |
| }); | |
| } else { | |
| logging.logInfo('no map'); | |
| resolve(); | |
| } | |
| }); | |
| }); | |
| }; | |
| } | |
| @NgModule({ | |
| declarations: [ | |
| AppComponent, | |
| LocationsListComponent, | |
| AppBarComponent, | |
| LocationDetailsComponent, | |
| MapComponent, | |
| NumberRangeValidator | |
| ], | |
| providers: [ | |
| AppConfigService, | |
| GoogleMapsService, | |
| LoggingService, | |
| { | |
| provide: APP_INITIALIZER, | |
| useFactory: appConfigInit, | |
| multi: true, | |
| deps: [AppConfigService, GoogleMapsService, LoggingService] | |
| }, |
During app initialization, a function appConfigInit is called. The init sequence is not continued until the returned promise from the function is resolved. First, the configService loads app-config.json. If the config specified that we should use maps, the google maps api object is loaded with the specified API key. After the google api object has finished loading, the promise is resolved and the init sequence continues.
The GoogleMapsService looks like this:
This file contains hidden or bidirectional Unicode text that may be interpreted or compiled differently than what appears below. To review, open the file in an editor that reveals hidden Unicode characters.
Learn more about bidirectional Unicode characters
| import { Injectable } from '@angular/core'; | |
| import * as loadGoogleMapsApi from 'load-google-maps-api'; | |
| @Injectable() | |
| class GoogleMapsService { | |
| constructor() { } | |
| load(googleAPIKey: string): any { | |
| return loadGoogleMapsApi({ key: googleAPIKey }); | |
| } | |
| } | |
| export { GoogleMapsService }; |
Use PrimeNG’s GMap and the google map object
I use PrimeNG’s Gmap component for displaying the google map view. Notice that it is only displayed if we have specified “useMap”: true in app-config.json.
This file contains hidden or bidirectional Unicode text that may be interpreted or compiled differently than what appears below. To review, open the file in an editor that reveals hidden Unicode characters.
Learn more about bidirectional Unicode characters
| <div *ngIf="useMap"> | |
| <p-gmap *ngIf="options.center" [options]="options" [overlays]="overlays" [style]="{'width':'100%','height':'320px'}" | |
| (onMapReady)="onMapReady($event)" (onMapClick)="handleMapClick($event)"></p-gmap> | |
| </div> |
The GMap component requires a global google maps api object (as described in the APP_INITIALIZER section above). For my needs I have to access google.maps directly as well. For this to work with TypeScript I need to declare google in the component file:
This file contains hidden or bidirectional Unicode text that may be interpreted or compiled differently than what appears below. To review, open the file in an editor that reveals hidden Unicode characters.
Learn more about bidirectional Unicode characters
| import { Component, Input, OnInit } from '@angular/core'; | |
| import { Location } from '../models/location'; | |
| import { AppConfigService } from '../services/app-config.service'; | |
| import { MessageBrokerService } from '../services/message-broker.service'; | |
| import { NewMarkerFromMapMessage } from '../messages/new-marker-from-map.message'; | |
| declare var google: any; | |
| @Component({ | |
| selector: 'app-map', | |
| templateUrl: './map.component.html' | |
| }) | |
| export class MapComponent implements OnInit { | |
| options: any; | |
| overlays: any; | |
| map: any; | |
| readonly defaultPosition = { lat: 51.477847, lng: 0.0 }; | |
| readonly defaultZoom = 15; | |
| @Input('location') | |
| set value(loc: Location) { | |
| if (loc && this.map) { | |
| // Work with the google map object directly as modifying gmap's options | |
| // will not update the map | |
| this.map.setCenter({ lat: loc.Latitude, lng: loc.Longitude }); | |
| this.overlays = [ | |
| new google.maps.Marker({ position: { lat: loc.Latitude, lng: loc.Longitude }, title: loc.Name }) | |
| ]; | |
| } | |
| } | |
| constructor(private readonly appConfigService: AppConfigService, | |
| private readonly messageBroker: MessageBrokerService) { | |
| } | |
| onMapReady(event: any) { | |
| if (event.map) { | |
| this.map = event.map; | |
| } | |
| } | |
| handleMapClick(event) { | |
| this.messageBroker.sendMessage(new NewMarkerFromMapMessage(event.latLng.lat(), event.latLng.lng())); | |
| } | |
| ngOnInit() { | |
| this.options = { | |
| center: this.defaultPosition, | |
| zoom: this.defaultZoom | |
| }; | |
| } | |
| get useMap(): boolean { | |
| return this.appConfigService.useMap; | |
| } | |
| } |
There is an onHandleMapReady() event handler that saves the map object when the intial map is ready. The location to use is set via an Input()-property (from the parent component). It uses the map object to center the view (according to the new location) and creates a new overlay collection that contains a marker for the new position.
Selecting what repository to use
The app-config.json file specifies if to use mock/fake data or real data from an external service. There are two different LocationService-implementations that implements the same interface. Which one to use is decided by a provider in app.module.ts. The provider has a factory method that is called when an implementation should be injected:
This file contains hidden or bidirectional Unicode text that may be interpreted or compiled differently than what appears below. To review, open the file in an editor that reveals hidden Unicode characters.
Learn more about bidirectional Unicode characters
| export function locationsServiceFactory() { | |
| return (http: HttpClient, configService: AppConfigService, logging: LoggingService): LocationsService => { | |
| if (configService.useFakeData) { | |
| logging.logInfo('use mock service'); | |
| return new LocationsServiceMock(); | |
| } else { | |
| logging.logInfo('use real service'); | |
| return new LocationsServiceImpl(http, configService); | |
| } | |
| }; | |
| } |
HttpInterceptorService
I use a HTTP_INTERCEPTOR provider for hooking into the http requests and provide error handling in one single place:
This file contains hidden or bidirectional Unicode text that may be interpreted or compiled differently than what appears below. To review, open the file in an editor that reveals hidden Unicode characters.
Learn more about bidirectional Unicode characters
| { | |
| provide: HTTP_INTERCEPTORS, | |
| useClass: HttpInterceptorService, | |
| multi: true, | |
| deps: [MessageBrokerService, LoggingService] | |
| }, |
The HttpInterceptorService depends on the MessageBrokerService and the LoggingService so that the errors are logged and can be sent as a notification to the user:
This file contains hidden or bidirectional Unicode text that may be interpreted or compiled differently than what appears below. To review, open the file in an editor that reveals hidden Unicode characters.
Learn more about bidirectional Unicode characters
| import { HttpErrorResponse, HttpEvent, HttpHandler, HttpInterceptor, HttpRequest } from '@angular/common/http'; | |
| import { Injectable } from '@angular/core'; | |
| import { Observable, throwError } from 'rxjs'; | |
| import { catchError } from 'rxjs/operators'; | |
| import { ErrorOccurredMessage } from '../messages/error-occurred.message'; | |
| import { MessageBrokerService } from './message-broker.service'; | |
| import { LoggingService } from './logging-service'; | |
| @Injectable({ | |
| providedIn: 'root' | |
| }) | |
| export class HttpInterceptorService implements HttpInterceptor { | |
| constructor(private readonly messageService: MessageBrokerService, | |
| private readonly logging: LoggingService) { } | |
| intercept(req: HttpRequest<any>, next: HttpHandler): | |
| Observable<HttpEvent<any>> { | |
| return next.handle(req) | |
| .pipe( | |
| catchError((error) => this.handleError(error, this.messageService)) | |
| ); | |
| } | |
| private handleError(error: HttpErrorResponse, messageService: MessageBrokerService) { | |
| if (error && (typeof error.error === 'string')) { | |
| this.logging.logError('err: ' + error.error); | |
| messageService.sendMessage(new ErrorOccurredMessage(error.error)); | |
| } else if (error) { | |
| if (error.status === 0) { | |
| this.logging.logError('Connection error.'); | |
| messageService.sendMessage(new ErrorOccurredMessage('Connection error.')); | |
| } else { | |
| this.logging.logError('An error has occurred.'); | |
| messageService.sendMessage(new ErrorOccurredMessage('An error has occurred.')); | |
| } | |
| } | |
| return throwError(error); | |
| } | |
| } |
Certificate
The browser’s geolocation APIs only works properly if the application is hosted with SSL/https. Thus you need a certificate for the Angular application.
I have provided a self-signed certificate for testing purposes in the git repo, but you can create your own with e.g. OpenSSL. There is configuration file available that helps you do this (from this article about serving Angular over https locally). In the loc-poc/Clients/LocPocAngular folder, run:
cd certificates
openssl req -new -x509 -newkey rsa:2048 -sha256 -nodes -keyout localhost.key -days 3560 -out localhost.crt -config certificate.cnf
The self-signed certificate will give a warning in the browser as it is not verified by a third-party, but it is ok for testing purposes.
Next step
With the Angular application up-and-running, the next step is to setup the backend API so that we can persist the location items in a database. This will be covered in Part 3.
