
This post describes how I have setup an RFXtrx433E device with a Raspberry Pi to transform data from inexpensive 433 MHz motion- and climate-sensors into MQTT messages on my local network. With the data available as MQTT messages I can store the data in InfluxDB for viewing in Grafana, show the data in Home Assistant and route the data to cloud services.
Background
I have some home made sensor devices scattered around our home that sends detection and climate information via 433 MHz using my own simple protocol. The signals are registered by an ESP8266 device that transforms the messages to MQTT messages over IP. These MQTT messages then go into a database, to the cloud and into Home Assistant. See these posts for details:
The Sensor433 library and Geeetech transmitters and receivers
InfluxDB and Grafana for sensor time series
A self-hosted MQTT environment for Internet of Things – Part 3
Home Assistant – getting started and using MQTT sensors
I recently bought some inexpensive off-the-shelf 433 MHz sensor devices that I want to include in my home automation system. As they use proprietary protocols for communication, I looked for different solutions for parsing their data and finally settled on RFXtrx433E which is a 433 MHz transceiver that can read and write a set of different protocols.
My new sensors
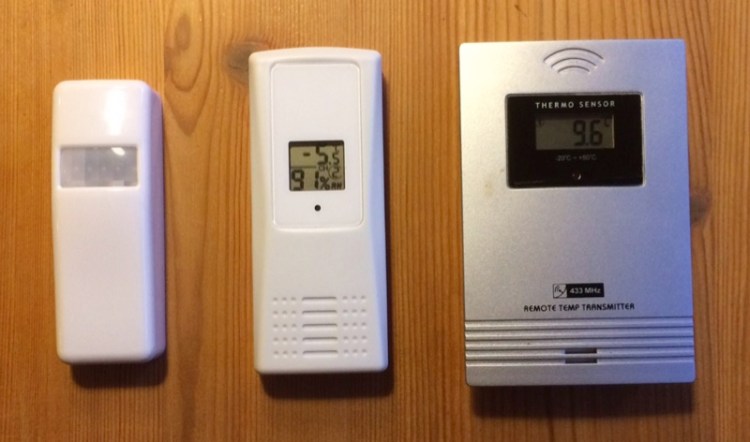
The new sensors that I want to include in my system are a Telldus motion sensor and a Telldus outdoor temperature/humidity sensor. I also have an old no-name thermometer that I want to add to my system.
Getting started with Rfxtrx433E
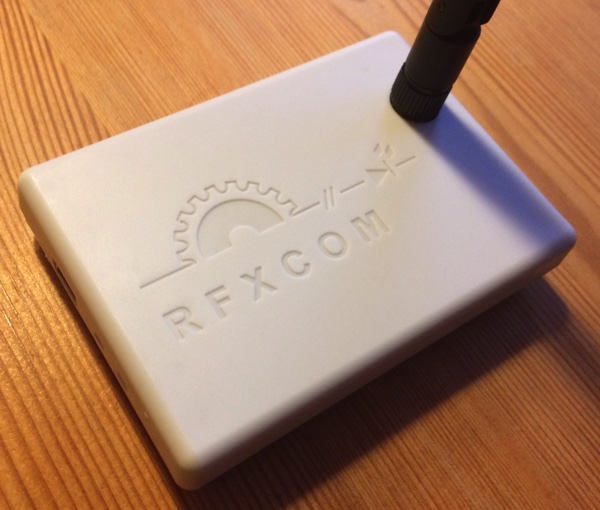
RFXtrx433E is a USB-attached device that supports a wide range of 433.92MHz protocols for incoming- and outgoing data.
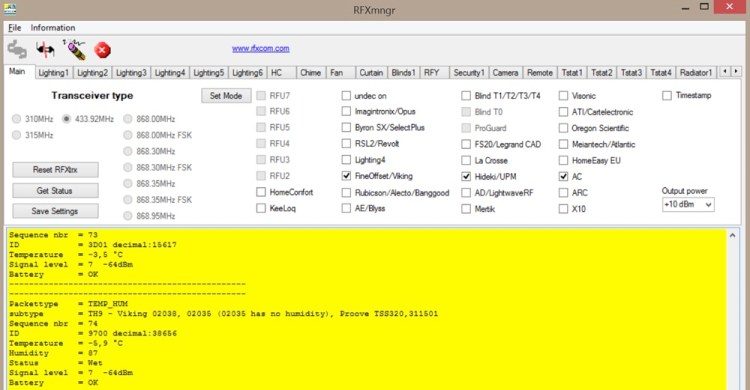
For reducing noise when reading data, it is preferable to activate only the protocols that are needed in your setup. To change active protocols and also test what works with your devices, rfxcom’s RFXmngr has to be used. It can be downloaded from rfxcom’s site http://www.rfxcom.com/.
Unfortunately it is a Windows-only application, so I had to boot up an old Windows PC to configure my RFX-device. I started out with all protocols activated and noted in rfxmngr what protocols and ID:s my new sensors used (by watching the log window when my devices transmitted data). I came up with these protocols and ID:s:

After reducing the number of active protocols to these ones and storing the settings on the device, I could move the RFXtrx433E to my Raspberry Pi / Linux environment.
Using the rfxtrx platform in Home Assistant
After attaching the RFXtrx433E to my Raspberry Pi, my first experiment was to let Home Assistant read from the device via USB. I set up the rfxtrx platform according to:
https://home-assistant.io/components/rfxtrx/
and added some rfxtrx sensors (for temperatures and humidity) and one binary sensor (for the motion sensor).
It worked fine, but as I want the data and events to also go into other destinations like a database, I figured it would be better to have the RFXtrx433E messages transformed into MQTT messages first and then let Home Assistant and other applications subscribe to these messages. How to achieve this? I found a solution with Node-RED, see below.
Using Node-RED for transforming RFXtrx433 messages to MQTT
Node-RED is a NodeJS-based platform that can be tailored for a lot of different purposes. It is very useful for transforming data from one format to another and let data go in different directions depending on conditions that you define. Node-RED is easy to install on a Raspberry Pi (see https://nodered.org/docs/hardware/raspberrypi) and it can be configured via a browser on port 1880 (default).
Node-RED is configured with “flows” that typically reads data from a set of sources, checks some conditions, transforms the data and outputs it to different destinations. I want to transform data from RFXtrx433E to MQTT. It turns out that there is a perfect Node-RED package (by Maxwell Hadley) for this purpose:
https://www.npmjs.com/package/node-red-contrib-rfxcom
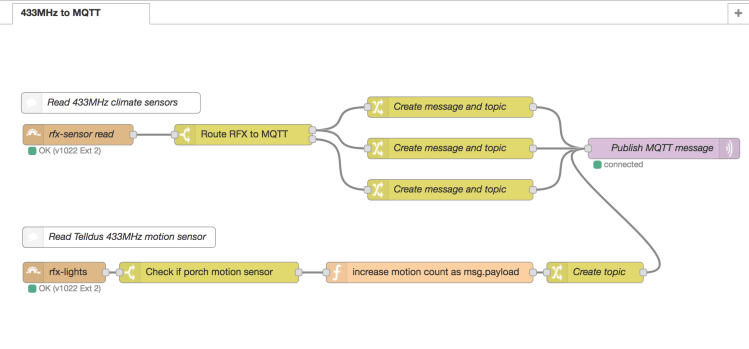
With this package installed for Node-RED, I was able to create a flow that transforms the data from my two climate devices (temperature, temperature+humidity) and my motion detector to MQTT messages:
Node-Red flow details
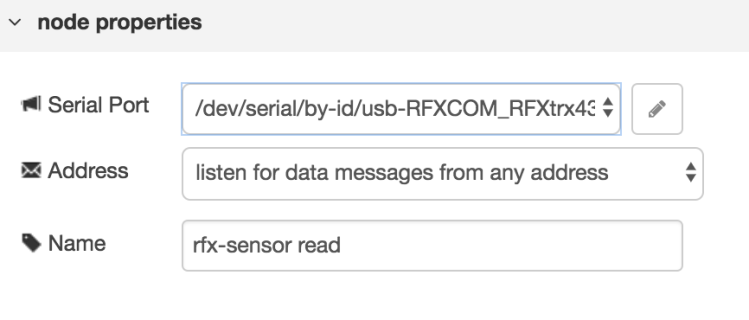
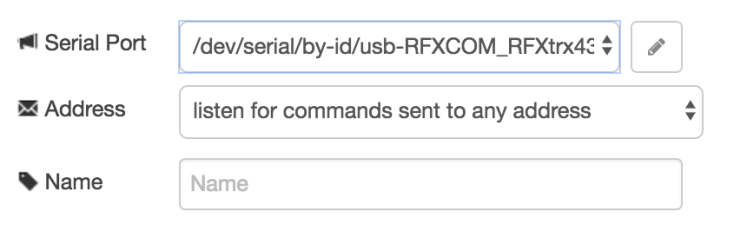
rfx-sensor read
This node reads from the rfxtrx device connected to the Raspberry pi. The msg.payload object will contain a temperature and a humidity property for my Telldus outdoor sensor and a temperature object for my no-name sensor. The msg.topic property is the name and ID of the device. (The structure of the rfxtrx objects can be investigated by adding a debug node to the rfx-sensor read node and checking the logs)
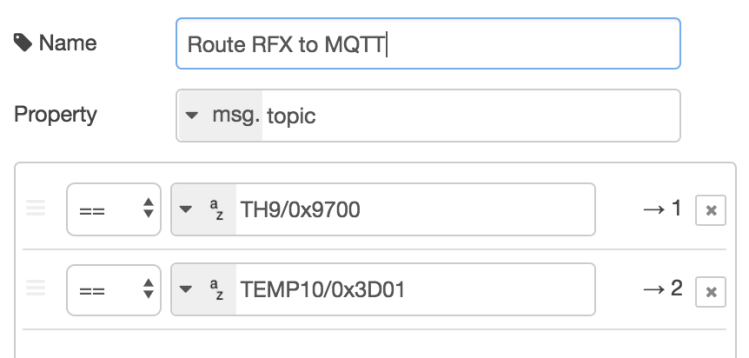
Route RFX to MQTT
This node routes the data to different nodes depending on the topic (which is the name and ID of the device):
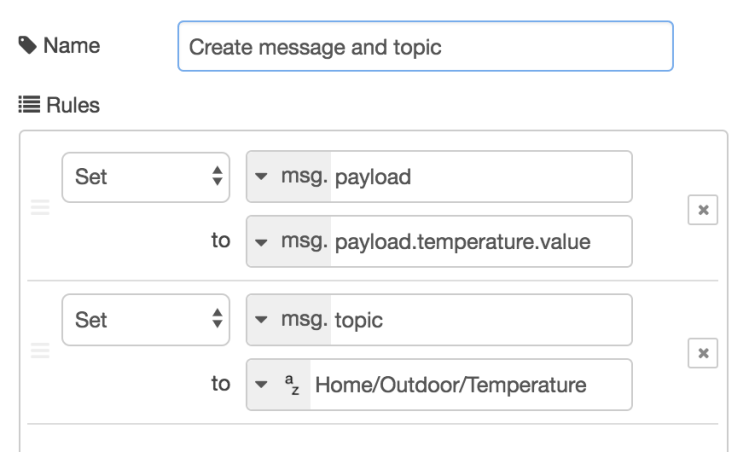
Create message and topic
These nodes takes the sensor value and sets it as msg.payload. The msg.topic is set to the desired MQTT topic. For the Telldus outdoor temperature, the node would be configured like this:
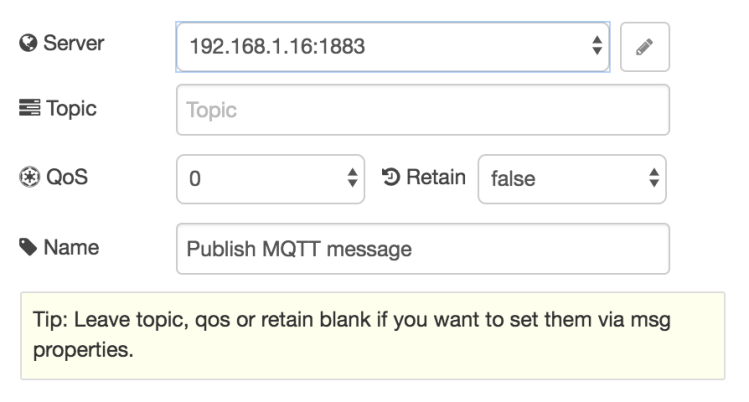
 Publish MQTT package
This node uses the msg.topic and msg.payload (from the previous node) as MQTT topic and MQTT message and publishes it to an MQTT broker (my broker is on IP address 192.168.1.16 with the default port 1883):
rfx-lights
The Telldus motion sensor sends on-events via a Lighting protocol. I thus use the rfx-lights input node to read the data:
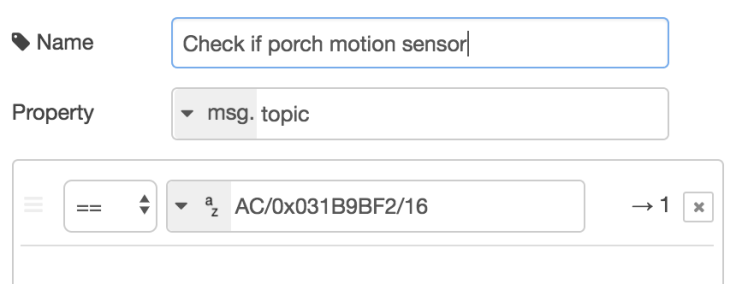
Check if porch motion sensor
To check that the on-event is actually from my device, I setup a switch node that only routes the message if it matches my device.
Increase motion count as msg.payload
Home Assistant registers only changes in values and to make a new motion detection appear properly in HA, I have to do a special treatment of the data: Instead of sending “on” from the motion sensor, I send a new value for each detected on-event. This can be achieved with a JavaScript-node in Node-RED:
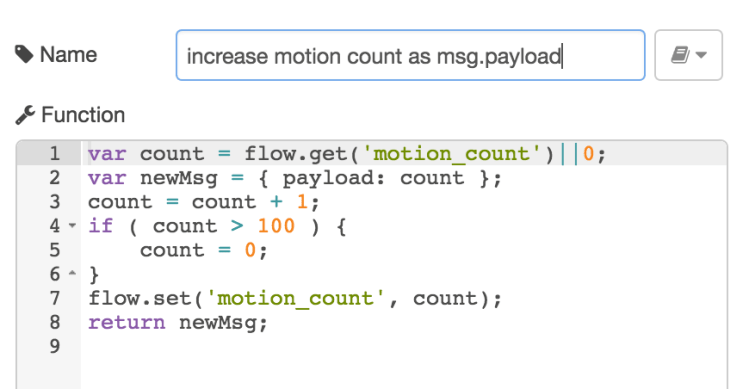
A counter in the flow is used for creating messages with values from 0-100 (and then the counter starts from 0 again).
Create topic
As the message for the motion sensor was created in the previous node, I only have to set the proper topic before publishing the MQTT message:

Testing the setup
The setup can be tested by using mosquitto_sub on a computer on the local network (where the -h switch specifies the ip-address where the mosquitto broker is running):
mosquitto_sub -h 192.168.1.16 -t "Home/#" -v
This command will subscribe to all MQTT topics starting with Home/ and outputs the topic and value when a message is received. With my sensors active, it should produce an output similar to:
Home/Porch/Temperature -2.6
Home/Outdoor/Temperature -3.6
Home/Outdoor/Humidity 82
Home/Porch/Motion 3
Configuring Home Assistant with MQTT sensors
I removed the rfxtrx-platform configurations from Home Assistant and added some MQTT sensors instead:
This file contains hidden or bidirectional Unicode text that may be interpreted or compiled differently than what appears below. To review, open the file in an editor that reveals hidden Unicode characters.
Learn more about bidirectional Unicode characters
| sensor: | |
| – platform: mqtt | |
| state_topic: "Home/Porch/Temperature" | |
| name: porch_temp | |
| unit_of_measurement: "°C" | |
| – platform: mqtt | |
| state_topic: "Home/Outdoor/Temperature" | |
| name: outdoor_temp | |
| unit_of_measurement: "°C" | |
| – platform: mqtt | |
| state_topic: "Home/Outdoor/Humidity" | |
| name: outdoor_humidity | |
| unit_of_measurement: "%" |
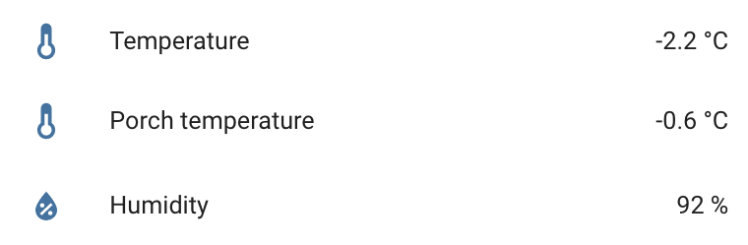
I use customization to give the entities dedicated icons and friendly names for the display:
This file contains hidden or bidirectional Unicode text that may be interpreted or compiled differently than what appears below. To review, open the file in an editor that reveals hidden Unicode characters.
Learn more about bidirectional Unicode characters
| customize: | |
| sensor.porch_temp: | |
| friendly_name: Porch temperature | |
| icon: mdi:thermometer | |
| sensor.outdoor_temp: | |
| friendly_name: Temperature | |
| icon: mdi:thermometer | |
| sensor.outdoor_humidity: | |
| friendly_name: Humidity | |
| icon: mdi:water-percent |
so that they look nice in my Outdoor group:
For the motion sensor to display when the last motion was detected, I use a template sensor:
This file contains hidden or bidirectional Unicode text that may be interpreted or compiled differently than what appears below. To review, open the file in an editor that reveals hidden Unicode characters.
Learn more about bidirectional Unicode characters
| sensor: | |
| – platform: template | |
| sensors: | |
| porch_last_motion: | |
| friendly_name: 'Porch last motion' | |
| icon_template: mdi:walk | |
| value_template: '{{ as_timestamp(states.sensor.porch_motion.last_updated) | timestamp_custom("%a %H:%M", True) }}' |
It will appear as:

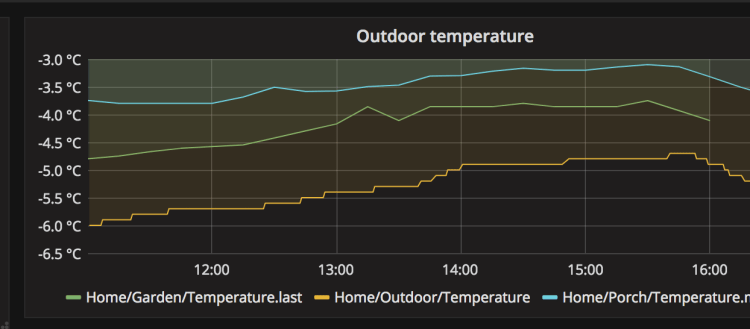
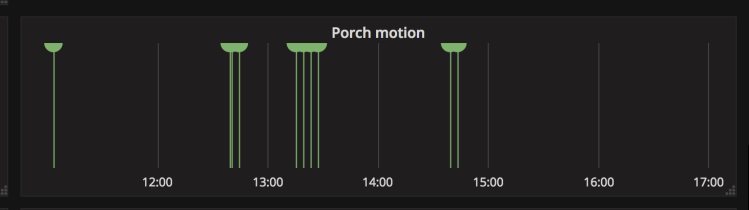
Storing the new MQTT messages in a database and viewing them with Grafana
In InfluxDB and Grafana for sensor time series I have described how I store all “Home/” messages in InfluxDB so that I can view them via Grafana. With my new topics available in the database, I can just add some new graphs to Grafana:
Routing the new MQTT messages to a cloud service
In A self-hosted MQTT environment for Internet of Things – Part 3 I have shown how I route MQTT message to the Adafruit IO cloud service. I can simply modify my routing rules to send my new topics to Adafruit IO. With Adafruit IO I can connect to IFTTT and build event chains depending on the data content.
Going further
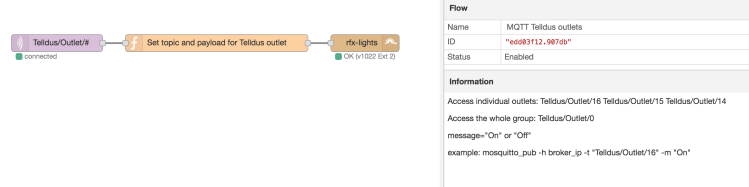
As the RFXtrx433E is a transceiver, it can also be used for sending commands. I have created a new Node-RED flow for controlling a set of Telldus 433 MHz outlets via MQTT. The Node-RED flow is available from my GitHub repository.
To understand what data to use in the rfx-lights-out component, I first created a NodeRED-flow with a rfx-light-in component with a debug-node attached. Then I used the remote control for the outlets and observed the debug output:
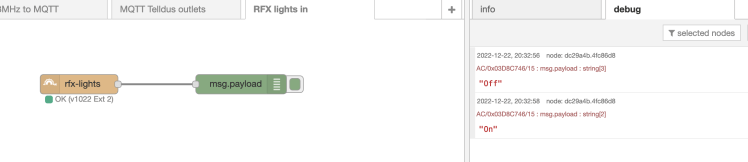
From these tests I could figure out what address and message to use in the rfx-lights-out node.
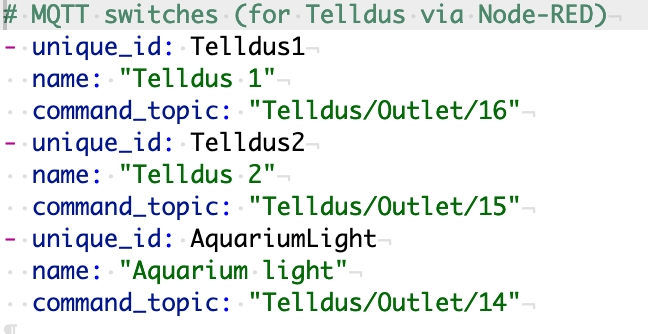
As I wanted to map from MQTT to rfx-lights-out, I first decided on to use to use these MQTT topics:
Telldus/Outlets/14
Telldus/Outlets/15
Telldus/Outlets/16
Then I made a custom JavaScript node in NodeRED that mapped from the MQTT topic to the msg.topic (that in turn will be used as address for rfx-lights-out). The script also maps the MQTT message to the msg.payload for rfx-lights-out.

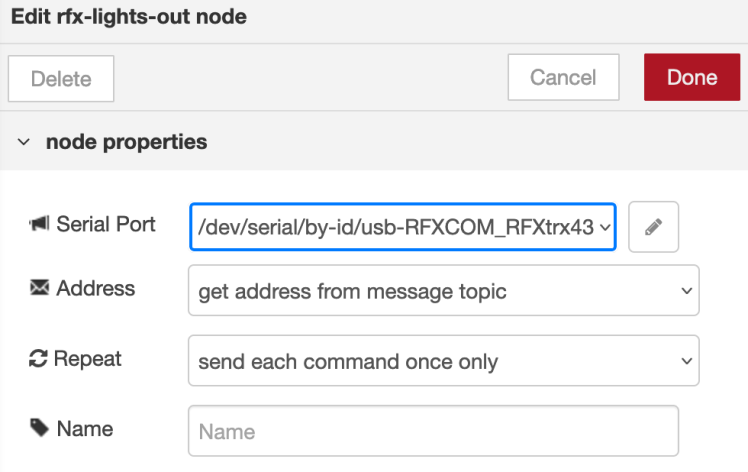
The rfx-lights-out node maps msg.topic to the address:
With this NodeRED-flow deployed, I could test it out with mosquitto_pub:

To be able to send these MQTT messages from Home Assistant I added some MQTT switch configuration in Home Assistant:
Configurations
My Home Assistant and Node-RED configurations are available from GitHub:
https://github.com/LarsBergqvist/Home-Assistant_configuration

Hi Lars! I’m thinking about going for your approach. As this post is three years old, do you have any comment or suggestion to add to it? What’s is the rfxcom setup you have today?
LikeLike
Hi! I have left the RFXtrx-system untouched for many years – it has just been working and doing its job. However, a couple of weeks of ago I wanted to add an additional thermometer. I had not kept my old Windows-machine with RfxMngr so I downloaded the program and installed it on a new Windows 10 Pro machine (version 20H2). It worked well and I could identify the code for the new thermometer and update my NODE-RED flow. I can not find RFXtrx433E for sale anymore but there is an RFXtr433XL-version available instead.
My HomeAssistant system has changed a lot during the last couple of years. The biggest change is that I use HassOS instead of a manual installation of HA on Raspbian. But the MQTT-sensors work in the same way. My latest HA-configuration looks like this: https://github.com/LarsBergqvist/home-assistant-config
For InfluxDB/Grafana, I have not made a fresh install for a long time. The system I have works fine, but I guess a new installation might be a bit different compared to the old one.
I still use Adafruit IO and IFTTT for a subset of MQTT-messages.
I hope this helps! Good luck with your experiments!
LikeLike
Hi,
I have plan to implement MQTT in my HA + NodeRed system and it looks like you have done it in a good way. But I have some questions that maybe you can help me with.
I would like to start using MQTT to get the connection to a database and Grafana.
First, do you know if it’s possible to have two sources connected to a USB device (RFXcom)?
I.e today a have the RFXcom connected to HA in configuration.yaml.
But I can’t get the RFXcom (rxf-sensor read) to connected in NodeRed if I have the configuration.yaml setup.
But if I remove the configuration.yaml setup and only have the NodeRed setup.
I can get the rfx-sensor to connect.
If the RFXcom setup is moved to NodeRed, how should I find out the name/topic of my today existing 433MHz wall plugs?
Is the topic the same as Entity_ID ?
Second, you have only described the input of RFXcom, how have you done with the outputs to RFX-com?
I.e I have wall plugs (433MHz) that are today connected/controlled with the RFXcom.
I don’t really understand how it should be setup with MQTT.
Should the output from the NodeRed automation both be connected to a “mqtt out” node and a “rfx out” node?
Or should it be connected/setup in any other way?
LikeLike
Hi! My guess is that you can not have multiple applications reading and writing to the RFXtrx-USB-device. But, the way I have solved it is by not connecting RFXtrx directly to HomeAssistant. Instead I connect it to NodeRed and let NodeRed publish MQTT messages that any number of consumers can subscribe to, in my case HomeAssistant (with MQTT-sensor configuration) and InfluxDB/Grafana (through a Python-script that listens to MQTT messages and writes to InfluxDB). So all messages goes “RFXtrx->NodeRed->MQTT->HomeAssistant” and “RFXtrx->NodeRed->MQTT->Grafana”.
I also send messages the other way around for triggering outlets on/off, i.e. “HomeAssistant->MQTT->NodeRed->RFXtrx”. I have only described it briefly at the end of the blog post, but the NodeRed-configuration (exported json-file) and a screenshot is available from this GitHub-repository: https://github.com/LarsBergqvist/node-red-flows/tree/master/Flows
My HA-configuration is available here: https://github.com/LarsBergqvist/home-assistant-config
I hope this helps!
LikeLike
Hi Lars,
Thank you.
If I understand you correct do you have your automation logic in HA. That’s why you send the on/off orders from HA->MQTT->NodeRed->RFXtrx.
But if you would have the automation logic in NodeRed. The on/off orders should only be sent from NodeRed to RFXtrx. Or should the orders go through MQTT, i.e NodeRed->MQTT-> RFXtrx?
Maybe it’s good to send the on/off orders to MQTT to keep track of them?
The orders could be sent parallell to RFXtrx and MQTT.
LikeLike
Yes, I have the automation logic in HA. The central part of my home automation system is a Mosquitto MQTT-broker on a Raspberry PI. HomeAssistant, NodeRed and other sub-systems subscribe to measurements/commands and sends measurements/commands through this broker. Thus there can be several sub-systems that do automation work. I realize that I should complement this blog post with a drawing that shows the setup. Will do that when I have time!
A previous drawing that showed how the system looked before I included RFXtrx is available in this post (it is focused on collecting sensor-data, but the idea with a central MQTT-broker is the same for the case when an MQTT-message is a command for a switch e.g.):
https://thingsmatic.com/2017/03/02/influxdb-and-grafana-for-sensor-time-series/
LikeLike
How do you determind how to setup the rfx-light output message, topic & payload…
If you want to control a certain 433MHz wall plug?
LikeLike
Hi, I made this setup many years ago so I had to revisit it to remember how I figured it out. While doing that I updated the section on the blog post with a description + some new screenshots that might help. In short, I used the rfx-lights-in component with a debug node attached to spy on the signals when using the remote control for the outlets. From the debug output I could see what address and payload to use. Hope that helps.
LikeLike
Hi Lars !
I love your work. I’m searching for make the same at home. During 8 years, I used Domoticz with my RFXCom 433. Everything worked well. I changed platform 3 months ago, now I use Home Assistant with the awfull add-on “RFXCOM RFXtrx”. It’s not at all intuitive, specialy for my 10 rolling shutters…
So, you guess, I want to control my 433Mhz rolling shutters by MQTT, in order to view my shutters as shutters in Google Home instead of switches. I have an “old” RFLink with me, so, I allready catched 6 radio frames from my wall switches easily (with RFLinkLoader on Windows). Could you tell me, please, how to adapt ?
This is what I catched (I wrote only 1 double shutter for exemple):
Parents shutters wall switch
20;0C;NewKaku;ID=0116d8de;SWITCH=1;CMD=ON; (left, down)
20;0D;NewKaku;ID=0116d8de;SWITCH=2;CMD=ON; (right, down)
20;0E;NewKaku;ID=0116d8de;SWITCH=1;CMD=OFF; (left, up)
20;0F;NewKaku;ID=0116d8de;SWITCH=2;CMD=OFF; (right, up)
Thanks
LikeLike
Thanks for your kind words! I made this experiment 6 years ago and have not fiddled with the setup since. But from what I remember the main point was to use Node-RED as a spy to see what signals to expect and then use Node-RED to emulate those signals with a transformation from MQTT:
* Setup an “rfx-lights” component (configured for RFXCOM) and attach it to a debug component. This is available in the “RFX lights in” tab in my Node-RED setup (available as download from here: https://github.com/LarsBergqvist/node-red-flows)
* Then use the remote control for the switches to generate some signals an observe the debug output from Node-RED.
For example, I got these topics for two different switches: AC/0x03D8C746/16 and AC/0x03D8C746/15 with payload “On” and “Off”
* From this I deduced that the identifier for my set of switches was “AC/0x03D8C746” and that /15 and /16 identified a specific switch
* So I configured a new Node-RED flow (available in the “MQTT Telldus outlet”-tab in my Node-Red example) that listens to MQTT messages (generated from Home Assistant e.g.), then transforms that MQTT-topic (with javascript) into the expected topic that the “rfx-lights” node in Node-RED expects.
If you load my example (https://github.com/LarsBergqvist/node-red-flows) into Node-RED and try spying on signals from the remote control, maybe you can get some hints on how to generate the signals for your setup?
LikeLike
WELL. I found another way 3 days ago. I found this: https://github.com/davidramosweb/home-assistant-custom-components-cover-time-based
It works well in Home Assistant for my roller shutters. 😉
But I admit that I found the manipulation before your response. I managed under Node-RED (with debugging) to catch the radio frames and reproduce them in MQTT(under Node-RED). But this only diverts the problem, I would like to have my shutters in Google Home to simply control them by voice. Something I was able to do with “Cover Time Based Component” 😉 Thanks.
LikeLike
This is a great way to integrate inexpensive 433 MHz devices with your home automation system.
LikeLike