
Since my formative Commodore days (and even before with Colecovision), I’ve always loved platform games, and now I’ve found a fun programming exercise in making one for iOS. I have already explored the basics of Swift, Xcode and SpriteKit in my previous post, and now I am going further with the game level design.
SpriteKit has a designer where you can create a scene/level by adding and modifying sprites on a canvas. I quickly realized that just adding sprites with graphics was a really bad idea. It would be a horrible task to change the graphics later on for all game levels. Instead I tested the practice of separating the graphics/texture design from the actual level design:
- Draw “dummy sprites” (no attributes or textures) to position your sprites
- Give each sprite type a dedicated name that you set as the name property of the sprite, e.g. “ground N”, “ground NE”, “ground NW”
- In your GameScene code, iterate over all sprites and map them to textures based on the name property of each sprite
This implementation is based on using enumerateChildNodesWithName. In the example below I just iterate over all the sprites regardless of names and then look up the name of the texture to be used based on the name of the sprite block drawn in the game scene. You can of course search for particular sprite blocks based on specific names and apply any operation on this collection.
 let nodeNameToImageNameMap = [ "brick": "brick", "waterball": "waterball", "spaceship": "Spaceship"]

 override func didMoveToView(view: SKView) {
    self.enumerateChildNodesWithName("*") {
       node,stop in
       if let name = node.name {
          if let imageName = self.nodeNameToImageNameMap[name] {
             if let sprite = node as? SKSpriteNode {
                   sprite.texture = SKTexture(imageNamed: imageName)
             }
          }
       }
    }
 }
A code example for this can be found at: https://github.com/LarsBergqvist/Separating-SpriteKit-game-scene-from-graphics-design.git
This was a nice separation of concerns, but after a while I found the game scene designer in Xcode pretty much useless. I wanted to make a retro-platform game where the levels were built up by fixed size blocks. The designer does not have a grid function. You can use shift+move to auto-align sprite blocks, but this feature is so shaky that it takes ages to get properly aligned blocks for just one level. Frustration, swearing and more frustration. Let’s face it – this sucks for fast game level design.
Back to square one. I revisited the requirements and found out that the top features for my level design REALLY should be:
- It should be easy and fast to create a new MxN block level (Xcode’s game scene designer totally fails at this)
- The graphics/textures should be easy to exchange for all levels at once (loading textures dynamically as explained above would fulfill this one)
- My 4- and 8-year old kids should be able to design their own levels
- Render the game scene/level dynamically based on 1-3 (easy to do but some extra work is needed to stay true to the SOLID principles)
So I decided on this approach:
- Let each block in a level be defined by a character
- Keep a map between each character and the texture that it represents
- Keep a map between each character and the physics attributes (mass etc) that the item should have in SpriteKit (ok, not as easy for pre-school kids, but the parents gladly take the opportunity of having a math/physics lesson disguised as a gaming session)
- Represent a block level with M columns and N rows by a string that is MxN long (ok as long as the string is nicely formatted in the editor)
So, imagine that you have these retro texture blocks to work with (from opengameart.org):
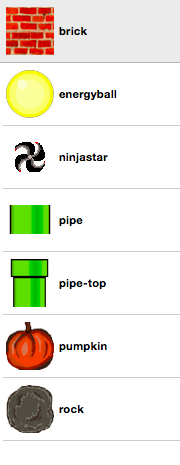
You can map these image assets to characters with a simple dictionary:
let charToImageNameMap = [
"T": "pipe-top",
"I": "pipe",
"*": "brick",
"R": "rock",
"P": "pumpkin",
"E": "energyball",
"X": "ninjastar" ]
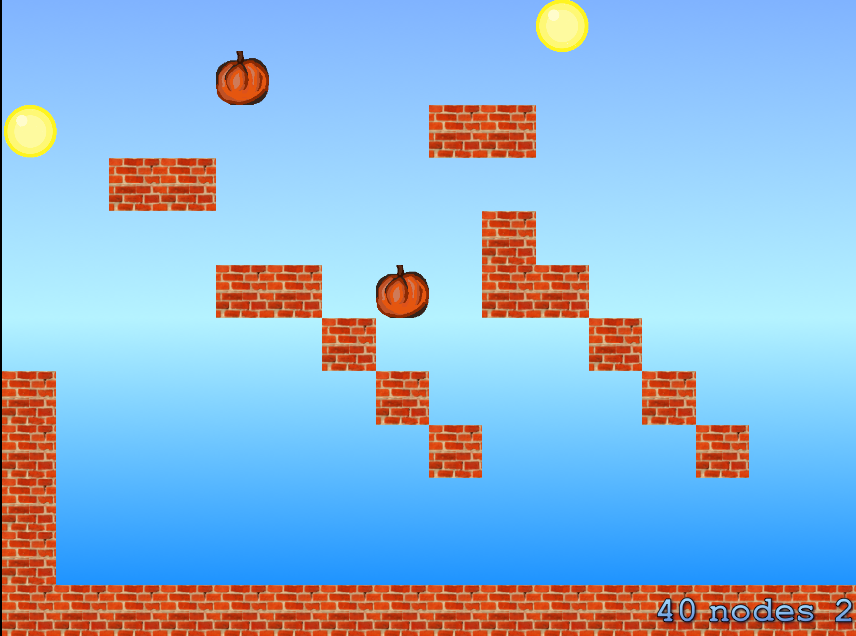
These characters can be included in a representation of a 16×12 block scene in the form of a string:
let level1 =
"          E     " + // 1
"    P           " + // 2
"E       **      " + // 3
"  **            " + // 4
"         *      " + // 5
"    ** P **     " + // 6
"      *    *    " + // 7
"*      *    *   " + // 8
"*       *    *  " + // 9
"*               " + // 10
"*               " + // 11
"****************"   // 12
When applied to the the game scene, it looks like this (when no gravity is applied – thus the fruits&balls hangs in the air):
To apply physical attributes for each type of gaming object, you can again apply a simple dictionary (in this case a map between characters and dedicated objects that keeps track of the sprite physics):
 let charToPhysicsMap = [
 "T": ObjectPhysics(mass: 10, restitution: 0.0, friction:0.8, isDynamic: false, allowsRotation: false,autoRotate:false),
 "I": ObjectPhysics(mass: 10, restitution: 0.0, friction:0.8, isDynamic: false, allowsRotation: true,autoRotate:false),
 "*": ObjectPhysics(mass: 10, restitution: 0.0, friction:0.3, isDynamic: false, allowsRotation: false,autoRotate:false),
 "R": ObjectPhysics(mass: 6, restitution: 0.2, friction:0.5, isDynamic: true, allowsRotation: true,autoRotate:false),
 "P": ObjectPhysics(mass: 3, restitution: 0.4, friction:0.5, isDynamic: true, allowsRotation: true,autoRotate:false),
 "E": ObjectPhysics(mass: 0.5, restitution: 0.9, friction:0.7, isDynamic: true, allowsRotation: true,autoRotate:false),
 "X": ObjectPhysics(mass: 25, restitution: 0.5, friction:0.3, isDynamic: true, allowsRotation: true,autoRotate:true) ]
A complete code example for iOS where you can touch the screen to switch between a set of basic game levels is available at: https://github.com/LarsBergqvist/SpriteKit-scene-from-string-matrix
Game on!
