
In two previous posts, I used the RCSwitch and pi-switch libraries for communication between an Arduino Uno and a Raspberry Pi. I touched briefly on the main purpose with these libraries – to control RC outlets. In this post I will dig deeper and decode the RC signals so that the remote control can be replaced by a web app running on any browser-enabled device.
As at least one mobile phone is always within reach at home, I don’t need to search the house for the one and only RC remote anymore!
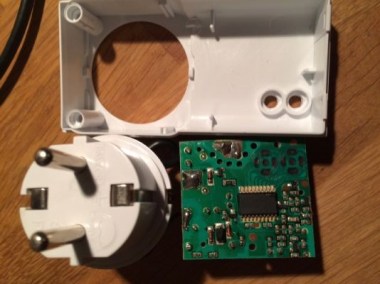
My remote controlled outlets
My outlets are the cheapest possible, I bought 3 outlets with one remote control for $15. The brand is Luxorparts. Each outlet has a switch that assigns it to one of 4 different “groups” and within each group there are 4 different ID:s that can be selected. The remote control has 4 sets of on/off buttons and a switch for selecting group 1-4. It can thus address up to 16 outlets.


Setting up the sniffing environment
Previously I had tested that RCSwitch could sniff RC codes from my RC control and resend it to my outlets. Digging deeper, I opened one of the outlets up to check what’s inside. Besides the relay and a small antenna, there’s an SC5272 chip which is on the list of compatible chips for the RCSwitch library.
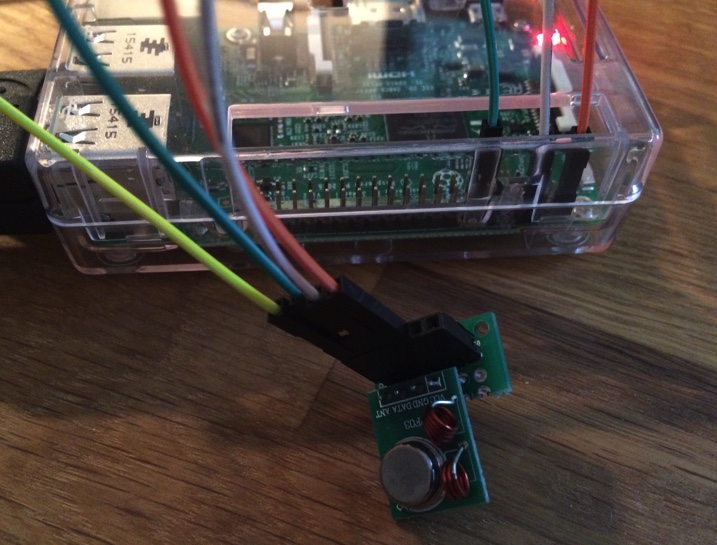
I used an Arduino Uno with a simple 433 MHz receiver as hardware environment for sniffing the codes from the remote control.

The software is the RCSwitch library and the ReceiveDemo_Advanced example. One of the receiver outputs (there are two of them) is wired to pin 2 on the Arduino, and GND and 5V is also wired from the Arduino:
To start decoding, I uploaded the ReceiveDemo_Advanced sketch and started the Serial Monitor. When pressing one of the buttons on the remote transmitter control, I got an output like:
Decimal: 1397845 (24Bit) Binary: 000101010101010001010101 Tri-State: 0FFFFFF0FFFF PulseLength: 425 microseconds Protocol: 1
Raw data: 13268,444,1272,440,1272,444,1268,1304,416,436,1276,1292,424,436,1276,1292,424,436,1276,1292,424,432,1288,1284,428,428,1288,1280,432,424,1288,428,1288,424,1288,1284,440,420,1292,1272,444,416,1296,1272,440,1272,444,1272,444,
Decoding
I tested all combinations of on/off for all ID:s for every group with the remote control. This generated a set of 32 24-bit binary numbers. From the pattern of zeros and ones in the set, it was obvious that the 24-bit code should be divided into bytes. When translated to hexadecimal, I got this table for the codes:

So, the least significant bit in byte 0 apparently signals on or off for an outlet. Byte 2 is an id for the selected group and byte 1 is the ID within the group. Bit 1-7 of byte 0 is always 0101010 so it appears to work as an error check of the transmitted code.
Send control signals from a Raspberry Pi
Wiring
I use a simple 433 Mhz transmitter together with an RPi 3 to send my outlet control signals. I use GPIO 17 (wiring pi pin 0) as output from the RPi to the transmitter. Ground and 5V comes from the Raspberry Pi and the yellow cable in the image below acts as an antenna.
Libraries
For the Pi, I use a Python wrapper for RCSwitch, pi-switch. Pi-switch requires some pre-reqs but, but is easy to setup by following this readme: https://github.com/lexruee/pi-switch-python/blob/master/README.md
Test
As a test for checking if everything is connected correctly, I started up Python, imported pi_switch and sent on/off signals:
import pi_switch
sender = pi_switch.RCSwitchSender()
sender.enableTransmit(0) # use WiringPi pin 0
sender.sendDecimal(0x151555, 24) # switch on outlet 1 in group 1
sender.sendDecimal(0x151554, 24) # switch off outlet 1 in group 1
It works! The outlet is switched on and off (group I, id 1 in this case).
Create the web app
My goal was to replace the remote control and use a web application instead. I have used a similar approach as in https://larsbergqvist.wordpress.com/2016/03/09/control-your-home-with-a-raspberry-pi-and-a-mobile-phone/:
- A Python Flask web api on the Raspberry Pi that acts on http requests and controls the GPIO pins on the device
- An AngularJS front end that makes REST calls to the web api
After installing Flask (sudo pip install flask), I created the web api:
This file contains hidden or bidirectional Unicode text that may be interpreted or compiled differently than what appears below. To review, open the file in an editor that reveals hidden Unicode characters.
Learn more about bidirectional Unicode characters
| from flask import Flask, jsonify, request | |
| from outletdefinitions import outlets | |
| import codesender | |
| app = Flask(__name__) | |
| @app.route("/Outlets/api/outlets", methods=["GET"]) | |
| def get_outlets(): | |
| return jsonify({"outlets" : outlets}) | |
| @app.route("/Outlets/api/outlets/<int:buttonNumber>",methods=['PUT']) | |
| def clickButton(buttonNumber): | |
| state=request.json.get("state") | |
| print(buttonNumber) | |
| print(state) | |
| codesender.sendCode(buttonNumber,state) | |
| return state | |
| if __name__ == "__main__": | |
| app.debug = True | |
| app.run(host='0.0.0.0',port=5000) |
The pi-switch operations are put in a separate module:
This file contains hidden or bidirectional Unicode text that may be interpreted or compiled differently than what appears below. To review, open the file in an editor that reveals hidden Unicode characters.
Learn more about bidirectional Unicode characters
| import pi_switch | |
| byte0codeON = 0x55 | |
| byte0codeOFF = 0x54 | |
| byte2 = 0x15 #This is group 1 | |
| buttonToIDCodesMap = { | |
| 1: 0x15, | |
| 2: 0x45, | |
| 3: 0x51, | |
| 4: 0x54 | |
| } | |
| def sendCode(buttonNumber,state): | |
| idcode = buttonToIDCodesMap[buttonNumber] | |
| byte0code = byte0codeON | |
| if state == 'off': | |
| byte0code = byte0codeOFF | |
| code = (byte2 << 16) | (idcode << 8) | byte0code | |
| print(format(code,'000000x')) | |
| sender = pi_switch.RCSwitchSender() | |
| sender.enableTransmit(0) | |
| sender.sendDecimal(code,24) |
The definitions of the outlets are also in a separate file:
This file contains hidden or bidirectional Unicode text that may be interpreted or compiled differently than what appears below. To review, open the file in an editor that reveals hidden Unicode characters.
Learn more about bidirectional Unicode characters
| outlets = [ | |
| {"id":"1","name":"Spotlights"}, | |
| {"id":"2","name":"Stereo"}, | |
| {"id":"3","name":"Table lamp"}, | |
| {"id":"4","name":"Floor lamp"} | |
| ] |
As I only have 3 physical outlets (and this example have 4 outlets) I used a fixed group (group 1) for the outlets. It would be possible to extend this api so that outlets within different groups could be addressed, but it is out-of-scope for my experiment.
The web api is started with:
sudo python remotecontrol.py
And to test the api, we can use CURL:
curl -i -H "Content-Type: application/json" -X PUT -d '{"state":"on"}' http://<RPI_IP>:5000/Outlets/api/outlets/4
(where <RPI_IP> is the ip address of the Raspberry Pi).
To hook up the html front end, I added an additional route in remotecontrol.py:
This file contains hidden or bidirectional Unicode text that may be interpreted or compiled differently than what appears below. To review, open the file in an editor that reveals hidden Unicode characters.
Learn more about bidirectional Unicode characters
| from flask import render_template | |
| @app.route("/Outlets/",methods=["GET"]) | |
| def index(): | |
| return render_template("index.html") |
The front end is a simple AngularJS application with a table and a controller in JavaScript:
This file contains hidden or bidirectional Unicode text that may be interpreted or compiled differently than what appears below. To review, open the file in an editor that reveals hidden Unicode characters.
Learn more about bidirectional Unicode characters
| <!DOCTYPE html> | |
| <html ng-app="myApp" style="height: 100%"> | |
| <head> | |
| <script data-require="angular.js@1.4.8" data-semver="1.4.8" src="https://code.angularjs.org/1.4.8/angular.js"></script> | |
| <link rel="stylesheet" href="https://maxcdn.bootstrapcdn.com/bootstrap/4.0.0-alpha.2/css/bootstrap.css" /> | |
| <script src="/static/Controller.js"></script> | |
| </head> | |
| <body style="height: 100%"> | |
| <div ng-controller="OutletController" style="height: 100%"> | |
| <div style="height: 100%"> | |
| <table class="table table-hover" style="height: 100%"> | |
| <tbody style="height: 100%"> | |
| <tr ng-repeat="item in outlets"> | |
| <td class="vert-align"> | |
| <button class="btn btn-success btn-block" style="font-size: 60px; display: block; height: 100%" type="button" ng-bind="item.name + ' on'" ng-click="pressButton(item.id,'on')"></button> | |
| </td> | |
| <td class="vert-align"> | |
| <button class="btn btn-warning btn-block" style="font-size: 60px; display: block; height: 100%" type="button" ng-bind="item.name + ' off'" ng-click="pressButton(item.id,'off')"></button> | |
| </td> | |
| </tr> | |
| </tbody> | |
| </table> | |
| </div> | |
| </div> | |
| </body> | |
| </html> |
This file contains hidden or bidirectional Unicode text that may be interpreted or compiled differently than what appears below. To review, open the file in an editor that reveals hidden Unicode characters.
Learn more about bidirectional Unicode characters
| var myApp = angular.module('myApp', []); | |
| myApp.controller('OutletController', ['$scope', '$http', function($scope, $http) { | |
| $scope.header = 'Outlets'; | |
| var getOutletInfo = function() { | |
| $http.get("api/outlets").then(function(response) { | |
| var outlets = response.data.outlets; | |
| $scope.outlets = outlets; | |
| }, function(error) {} | |
| ); | |
| }; | |
| $scope.pressButton = function(id,action) { | |
| $http.put("api/outlets/"+id, { state : action}).then(function(response) { | |
| }, function(error) {} | |
| ); | |
| } | |
| getOutletInfo(); | |
| }]); |
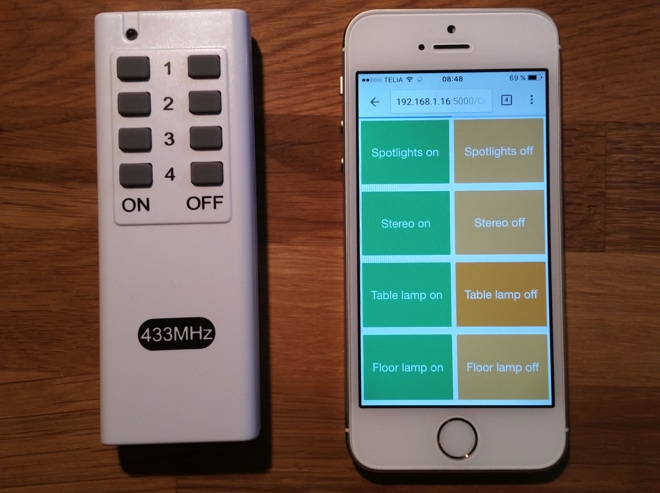
When the app is started, the defined list of outlets are fetched from the api and are bound to the html page as buttons in a table. When a button is pressed, a PUT/update call is made to the api, the RPi sends a 433 MHz signal with pi-switch and the outlet state is updated.
So, now I have a web server up an running on a Raspberry Pi on the local WiFi network, and I can access the Outlet app with:
http://<RPI_IP>:5000/Outlets/
and control the outlets via e.g. a mobile phone.
The complete code for this project is available on GitHub: https://github.com/LarsBergqvist/RemoteControlled_Outlets
Tinker on!

4 Thoughts