
During the past 6 months I have grown into a big fan of the Python programming language. I have also found a new passion in tinkering with the versatile and inexpensive ESP8266 microcontroller boards. For the embedded programming I usually stick with Arduino IDE and C/C++, but as there now is a Python implementation for ESP8266 available, I have to try it out and see if I can combine my two latest passions. In this post I will describe my first experiments with MicroPython on an ESP8266 board (an Adafruit Feather Huzzah).
Overview
MicroPython with ESP8266 can be programmed in several different ways:
- With a serial REPL where you can run commands directly on the board from a terminal on a USB-connected computer
- With an uploaded script that runs until the board is reset
- With an uploaded main.py script that will be loaded when the board boots
- With a WebRepl where you can access the ESP8266 via WiFi
Documentation and references
MicroPython is an implementation of Python 3 for microcontrollers. It was originally made for the PyBoard, but now there is an experimental port available the ESP8266 architecture.
The MicroPython site has some good documentation on ESP8266 and MicroPython:
http://docs.micropython.org/en/latest/esp8266/esp8266/tutorial/intro.html
and Adafruit has recently made a set of excellent tutorials on MicroPython + ESP8266:
- https://learn.adafruit.com/micropython-basics-what-is-micropython/overview?view=all
- https://learn.adafruit.com/building-and-running-micropython-on-the-esp8266/build-firmware?view=all
- https://learn.adafruit.com/micropython-basics-esp8266-webrepl/overview?view=all
The board
The ESP8266 board I’m using is an Adafruit Feather Huzzah:

Preparing the environment
I have used a MacBook Air for programming the ESP8266 with MicroPython. On this machine, there are several tools required.
Python and Python packages
If Python 2 and Python 3 are not installed already, get it from http://python.org.
If esptool is not installed already, install it with pip for Python 2: sudo pip2 install esptool
If adafruit-ampy is not installed already, install it with pip for Python 3: sudo pip3 install adafruit-ampy
(tip: to check what Python packages are installed on your system use pip/pip2/pip3 list).
Terminal emulator – screen
On OSX or Linux, the screen command can be used to interact with the MicroPython-enabled ESP8266 board. On Windows, you can use PuTTY (see this guide).
Optional: Visual Studio Code
This lightweight IDE is great for writing Python code.
Find the device name for the ESP8266
We need the device name of the USB port that is connected to the ESP8266 board. On OSX, it should be a tty device under /dev. You can locate the name by first listing /dev without having the board attached. Then, mount a USB cable between the board and the computer. List the /dev directory again. On my OSX, the Adafruit Huzzah appears as tty.SLAB_USBtoUART. So /dev/tty.SLAB_USBtoUART is the port name I will use in my examples.
Flashing the board
First download the latest MicroPython firmware for ESP8266 from:
http://micropython.org/download/#esp8266
I chose the latest official release at the time of writing, 1.8.3.
Use the esptool
Use the esptool to erase the ESP8266 and then flash it with the new MicroPython firmware:
esptool.py --port /dev/tty.SLAB_USBtoUART erase_flash
esptool.py --port /dev/tty.SLAB_USBtoUART --baud 115200 write_flash --flash_size=8m 0 esp8266-20160809-v1.8.3.bin
(you can experiment with different baud rates. 115200 worked for me, higher rates failed sometimes)
After resetting the board, the ESP8266 is ready to handle commands via a REPL.
Using the serial REPL
Now you can execute Python code directly on the ESP8266 via an interactive REPL. On OSX or Linux you can use the screen command to connect to the MicroPython REPL on the ESP8266:
screen /dev/tty.SLAB_USBtoUART 115200
Press enter once and you have a Python prompt! Now let’s type some Python commands to get a reaction on the board hardware:
import machine

redled=machine.Pin(0,machine.Pin.OUT)
redled.high()
redled.low()
this will turn off and then turn on the built-in red LED on the Huzzah. Let’s make a longer program:
import machine, time

redled=machine.Pin(0,machine.Pin.OUT)
blueled=machine.Pin(2,machine.Pin.OUT)

while True:
    redled.high()
    blueled.low()
    time.sleep(1.0)
    redled.low()
    blueled.high()
    time.sleep(1.0)
this will alternate light between the built-in red and blue LEDs on the Huzzah.
Stop the execution with ctrl-c.
To exit the REPL, press ctrl-a and enter :quit (or if this does not work, ctrl-a, ctrl-k, y).
File handling with ampy
Adafruit has has made a convenient tool for interacting with MicroPython boards via the serial port: Adafruit MicroPython tool “ampy”.
To run a Python script file on the board, use ampy with the run command. Take the code that you entered in the REPL and put it in a file “blinky.py”. Then use ampy to run it on the board:
ampy --port /dev/tty.SLAB_USBtoUART run blinky.py --no-output
The –no-ouput switch makes ampy run return without waiting for the script to finish. To view print outputs from the running script, open a separate terminal where you start the screen command to the device. Note that the screen/REPL has to be closed before uploading more files to the board.
ampy can also be used for uploading files to the ESP8266.
ampy --port /dev/tty.SLAB_USBtoUART put blinky.py
Then use ls to view the files on the ESP8266:
ampy --port /dev/tty.SLAB_USBtoUART ls
You can also download file contents from the board. Let’s get boot.py:
ampy --port /dev/tty.SLAB_USBtoUART get boot.py >boot.py
Boot.py will run when the board is reset.
The rm switch will remove a specified file from the board:
ampy --port /dev/tty.SLAB_USBtoUART rm blinky.py
Use ampy –help to view all options for the tool.
Make a detached board with a main.py file
When the board boots, it will load and run a main.py script file if it’s present. By uploading a main.py file you can get a board that is detached from any serial connection and can operate on its own, just like you would normally do with a board programmed with the Arduino IDE.
A typical Arduino project contains a setup()- and a loop()-function. In setup() you put stuff for initialization of the board and in loop() you put reading and writing of GPIO pins (or whatever) that should be done at a regular interval within an infinite loop. This schema can be mapped to a main.py file: Just use a Python While loop as an Arduino-style-loop.
With a “While True:” loop running in a main.py file, I had problems updating the main.py-file. I need a way to stop the script before uploading new files. This can be solved in three different ways:
- Open a separate terminal and connect with the screen/REPL command. Press Enter and then ctrl-c to stop the execution of the running script on the board. Then exit the screen/REPL.
- or reflash the board
- or add a hardware condition in the While True: loop
In this example, I have used option (3). Instead of an infinite While loop, my While loop checks the value of a GPIO pin. This pin is attached to a button and the loop continues if the button is not pressed. When I press the button, the While loop breaks and the main.py program finishes. After this I can access the board with serial communication again. So the iterative steps for developing on the board would be:
- Upload the first version of main.py
- Reset the board
- Test the board (that now runs main.py)
- Modify main.py on your development computer
- Stop main.py on the board by pressing the attached button
- Upload the modified main.py file to the board
- Go to 2
Here’s an example on how the While-loop-with-stop-button can be implemented:
The script runs an animation on a connected NeoPixel ring and my experimental setup looks like this:
![]()
Using the WebREPL
ESP8266 with MicroPython not only supports programming via a physical serial interface, you can actually program it via WiFi! This is pretty cool – now I can keep a device mounted (on the wall, on the ceiling, in the garage, whatever) and still being able to adjust or re-program it.
WebREPL is a small web page that you can download. Once in place on your development computer, switch from the normal WiFi access point to the access point that runs on the MicroPython-driven ESP8266. Its SSID should be something like “MicroPython-XXX” (the default WiFi password is micropythoN). If you then open webrepl.html, you should be able to connect to the device:
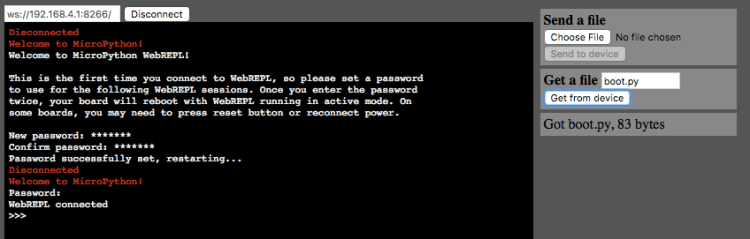
The first time you connect, you need to select a new access password for the board. After a reboot of the device, you can run REPL commands and upload- and download files.
Verdict
I love this! Testing new ideas and applying changes is much faster when you have REPL or WebREPL access compared to compiling and flashing the board with Arduino IDE and C/C++. As MicroPython is an interpreted language, the programs will run slower than with compiled code, but for many IoT-applications this does not matter.
I will definitely continue investigating MicroPython and try to adapt some upcoming IoT-projects for this platform.
Addendum
Two of my other MicroPython experiments can be found here:

Hi Lars!
Thank you for your very interesting blog. Love the articles your posting.
Perhaps I can return a bit of information to you too! 🙂
Looking at your self-hosted environment, MQTT, etc. etc.: have you already heard of Node-Red?
http://nodered.org/
It enables you to visually wire all kind of things together. MQTT to e-mail, websocket to database, e-mail to serial port, etc. etc.
This makes it possible to configure all kind of cool things without pretty much any programming in seconds.
You can add more ‘nodes’ than the default ones too using NPM. There are nodes for storing data in databases like MongoDB for example. Also, everything is open-source, so you can also develop your own nodes! 🙂
LikeLike
Hi Ethan! Thanks for your kind comments and nice tips on Node-RED! A few months ago I did a very quick test with Node-RED hosted on my RPi. I managed to quickly set up simple actions based on my local MQTT messages that are flying around at home, but I did not dig deep into the tool. Thanks for the reminder, I will definitely have a look again!
LikeLike