
In this post I will show how I have used a Raspberry Pi as a relay server that can be controlled via a web app on e.g. a mobile phone or via REST calls. The system consists of:
- A Raspberry Pi 2 with Raspbian
- A set of relays connected via the GPIO pins on the RPi
- Flask running a Python WebAPI on the RPi
- A Single Page Application made with HTML5, JavaScript and AngularJS where you can control the relays via the WebAPI
There are many inexpensive kits available for controlling voltage outlets at home, but making your own is an opportunity for learning and tinkering, so let’s go!
The hardware
I used an HUI KE relay board for my experiment.
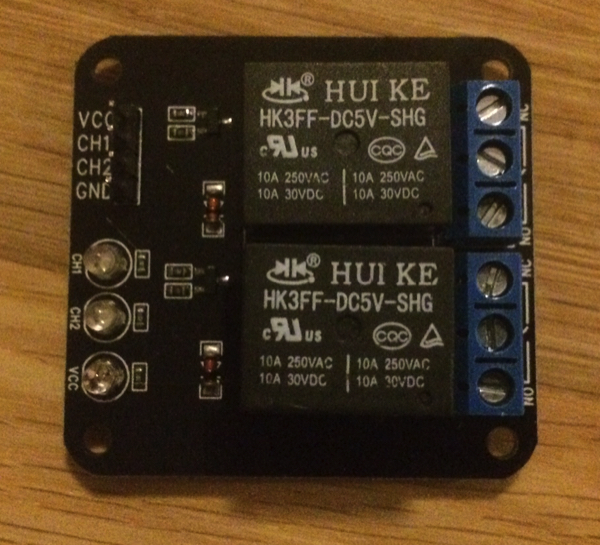
It has two relays and can operate in NC or NO mode. Which one you decide to use depends on if you want the relay circuit to be closed or open when no control signal is applied. If you have an electrical component that will be turned on most of the time, it makes sense to use NC (as no control current is consumed when the component is turned on). On the other hand, if you have something like a “welcome home” light that is only turned on short periods of time, NO is a better alternative. http://pcbheaven.com/wikipages/How_Relays_Work/ has an excellent description of how relays work.
The relay board needs 5V to operate, and from what I initially thought, 5V as control signals. As the Raspberry GPIO pins only gives 3.3V I thought I needed to build a level shifter or use my Arduino between the RPi and the relay. But my first tests showed that 3.3V as control signal was sufficient for triggering the relays. So, at least for this relay brand, the setup with RPi was very simple.
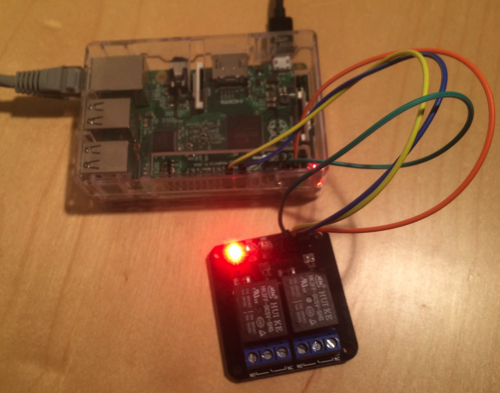
Note: This experiment only shows how to trigger the relays. If you are going to control 220/110V appliances with the relays, you really need to know what you are doing and isolate the relay board and the connected cables in a proper way!
The software
I wanted my relay controlling software to be implemented as a WebAPI so that it could be used in many different ways (via a web-, mobile- or desktop app). I opted for Flask, which is a web framework for Python.
I have used Python 3.4.2 in this experiment. I really like Python as a programming language – the only major drawback is the mismatch between Python 2 and 3 and that “Python” normally means Python 2.X if you have several versions installed. Thus, in the snippets below, pip3 and python3 is used to call up the correct version of Python.
Installing Flask
The Flask library is installed with pip (a package manager for Python). If you don’t have pip installed already, you can get it for Python 3 by:
sudo apt-get install python3-pip
Then to install Flask:
sudo pip3 install flask
Creating a WebAPI
The definitions of the relays are kept in a separate Python file, relaydefinitions.py. It contains a list of relays objects with the properties for each relay. There is also a separate dictionary that maps the id of the relay to the GPIO pin number on the Raspberry (so that we will not expose the pin number outside of the API).
This file contains hidden or bidirectional Unicode text that may be interpreted or compiled differently than what appears below. To review, open the file in an editor that reveals hidden Unicode characters.
Learn more about bidirectional Unicode characters
| relays = [ | |
| { 'id' : 1, 'name' : 'Window lamp', 'state' : 'off'}, | |
| { 'id' : 2, 'name' : 'Floor lamp', 'state' : 'off'}, | |
| { 'id' : 3, 'name' : 'TV etc', 'state' : 'off'}, | |
| { 'id' : 4, 'name' : 'Guitar equipment', 'state' : 'off'} | |
| ] | |
| relayIdToPin = { | |
| 1 : 24, | |
| 2 : 25, | |
| 3 : 14, | |
| 4 : 15 | |
| } |
The actual WebAPI is defined in webrelay.py. It starts with the import statements that are needed and some helper methods. Each http request is handled by a method decorated with @app.route. The decorator also defines what URL should be handled and what method (GET, PUT, POST). The methods should return JSON data, and there is a convenient method jsonify that can transform the Python objects into JSON for this purpose.
This file contains hidden or bidirectional Unicode text that may be interpreted or compiled differently than what appears below. To review, open the file in an editor that reveals hidden Unicode characters.
Learn more about bidirectional Unicode characters
| import RPi.GPIO as GPIO | |
| from flask import Flask, jsonify, abort, request, render_template | |
| from relaydefinitions import relays, relayIdToPin | |
| app = Flask(__name__) | |
| GPIO.setmode(GPIO.BCM) | |
| relayStateToGPIOState = { | |
| 'off' : GPIO.LOW, | |
| 'on' : GPIO.HIGH | |
| } | |
| def Setup(): | |
| for relay in relays: | |
| GPIO.setup(relayIdToPin[relay['id']],GPIO.OUT) | |
| GPIO.output(relayIdToPin[relay['id']],relayStateToGPIOState[relay['state']]) | |
| def UpdatePinFromRelayObject(relay): | |
| GPIO.output(relayIdToPin[relay['id']],relayStateToGPIOState[relay['state']]) | |
| @app.route('/WebRelay/api/relays', methods=['GET']) | |
| def get_relays(): | |
| return jsonify({'relays': relays}) | |
| @app.route('/WebRelay/api/relays/<int:relay_id>', methods=['GET']) | |
| def get_relay(relay_id): | |
| matchingRelays = [relay for relay in relays if relay['id'] == relay_id] | |
| if len(matchingRelays) == 0: | |
| abort(404) | |
| return jsonify({'relay': matchingRelays[0]}) | |
| @app.route('/WebRelay/api/relays/<int:relay_id>', methods=['PUT']) | |
| def update_relay(relay_id): | |
| matchingRelays = [relay for relay in relays if relay['id'] == relay_id] | |
| if len(matchingRelays) == 0: | |
| abort(404) | |
| if not request.json: | |
| abort(400) | |
| if not 'state' in request.json: | |
| abort(400) | |
| relay = matchingRelays[0] | |
| relay['state']=request.json.get('state') | |
| UpdatePinFromRelayObject(relay) | |
| return jsonify({'relay': relay}) | |
| if __name__ == "__main__": | |
| print("starting…") | |
| try: | |
| Setup() | |
| app.run(host='0.0.0.0',port=80,debug=False) | |
| finally: | |
| print("cleaning up") | |
| GPIO.cleanup() |
Start the web server
To start the web server, you simply execute webrelay.py with Python 3:
sudo python3 webrelay.py runserver
Test the API with Curl
With Curl, you can send http requests via the terminal and thus test the WebAPI. If you run your RPi on your local LAN, you can run Curl on a different computer and access the API hosted on the RPi (replace myraspberry below with the local ip of your RPi).
To get a list with information about the defined relays:
curl -i http://myraspberry:80/WebRelay/api/relays
To get information about a specific relay:
curl -i http://myraspberry:80/WebRelay/api/relays/1
To alter the state of a specific relay:
curl -i -H "Content-Type: application/json" -X PUT -d '{"state":"off"}' http://localhost:80/WebRelay/api/relays/1
Creating a SPA front-end with AngularJS
Now that we have Flask up and running and serving http requests with JSON responses, we can also return html to create a GUI for our API. You do this by returning the result from render_template() in an @app.route decorated method:
This file contains hidden or bidirectional Unicode text that may be interpreted or compiled differently than what appears below. To review, open the file in an editor that reveals hidden Unicode characters.
Learn more about bidirectional Unicode characters
| @app.route('/WebRelay/', methods=['GET']) | |
| def index(): | |
| return render_template('Index.html'); |
render_template() will look in a subfolder templates for the specified html file and return it to the caller. So if you are making the call from a web browser, you will get a web page back.
To get data into the html, Flask supports templating html with Jinja2. I wanted to use an AngularJS SPA front-end for a more dynamic user experience and it turns out that it is fully possible with a few quirks:
- The html will be parsed as Jinja2 by Flask. Jinja2 uses {{}} for inserting values into the html, which is the same characters that AngularJS uses for binding data. The solution is to configure AngularJS to use a different syntax by setting start- and end symbols on $interpolationprovider. I have used [[]] as symbols.
- The html file that is used by Flask’s render_template() must reside in the templates sub folder. Files that are referenced from the html files (like javascript, images and css) must reside in a different subfolder called static.
Given these pre-requisites, we can create our simple AngularJS app with a html file and a controller in JavaScript to handle the actions.
This file contains hidden or bidirectional Unicode text that may be interpreted or compiled differently than what appears below. To review, open the file in an editor that reveals hidden Unicode characters.
Learn more about bidirectional Unicode characters
| <!DOCTYPE html> | |
| <html ng-app="myApp"> | |
| <head> | |
| <script data-require="angular.js@1.4.8" data-semver="1.4.8" src="https://code.angularjs.org/1.4.8/angular.js"></script> | |
| <link rel="stylesheet" href="https://maxcdn.bootstrapcdn.com/bootstrap/4.0.0-alpha.2/css/bootstrap.css" /> | |
| <script src="/static/Controller.js"></script> | |
| <link rel="stylesheet" href="/static/style.css" /> | |
| </head> | |
| <body> | |
| <div ng-controller="RelaysController"> | |
| <div> | |
| <h1 ng-bind="header"></h1> | |
| </div> | |
| <div> | |
| <table class="table table-hover"> | |
| <thead class="thead-default"> | |
| <tr> | |
| <th>Id</th> | |
| <th>Name</th> | |
| <th>State</th> | |
| </tr> | |
| </thead> | |
| <tbody> | |
| <tr ng-repeat="item in relays"> | |
| <td class="vert-align" ng-bind="item.id"></td> | |
| <td class="vert-align"> | |
| <b ng-bind="item.name"</b> | |
| </td> | |
| <td class="vert-align"> | |
| <img ng-src=[[item.image]] ng-click="toggleRelay(item)"> | |
| </td> | |
| </tr> | |
| </tbody> | |
| </table> | |
| </div> | |
| </div> | |
| </body> | |
| </html> |
This file contains hidden or bidirectional Unicode text that may be interpreted or compiled differently than what appears below. To review, open the file in an editor that reveals hidden Unicode characters.
Learn more about bidirectional Unicode characters
| var myApp = angular.module('myApp', []) | |
| .config(function($interpolateProvider) { | |
| $interpolateProvider.startSymbol('[[').endSymbol(']]'); | |
| }); | |
| var addImageToRelayObjects = function(relayObjects) { | |
| for (var i=0; i < relayObjects.length; i++) { | |
| var relay = relayObjects[i]; | |
| if (relay.state == 'on') { | |
| relay.image = '/static/on_button.gif'; | |
| } | |
| else { | |
| relay.image = '/static/off_button.gif'; | |
| } | |
| } | |
| return relayObjects; | |
| }; | |
| myApp.controller('RelaysController', ['$scope', '$http', function($scope, $http) { | |
| $scope.header = 'Relay status'; | |
| var getRelayInfo = function() { | |
| $http.get("api/relays").then(function(response) { | |
| var relays = response.data.relays; | |
| addImageToRelayObjects(relays) | |
| $scope.relays = relays; | |
| }, function(error) {} | |
| ); | |
| }; | |
| $scope.toggleRelay = function(relay) { | |
| var newState = 'off'; | |
| if (relay.state == 'off') { | |
| newState = 'on'; | |
| } | |
| $http.put("/WebRelay/api/relays/"+relay.id, { state : newState}).then(function(response) { | |
| relay = response.data.relay; | |
| if (relay.state == 'on') { | |
| relay.image = '/static/on_button.gif'; | |
| } | |
| else { | |
| relay.image = '/static/off_button.gif'; | |
| } | |
| for (var i=0; i < $scope.relays.length; i++) { | |
| if ($scope.relays[i].id == relay.id) { | |
| $scope.relays[i] = relay; | |
| break; | |
| } | |
| } | |
| }, function(error) {} | |
| ); | |
| } | |
| getRelayInfo(); | |
| }]); |
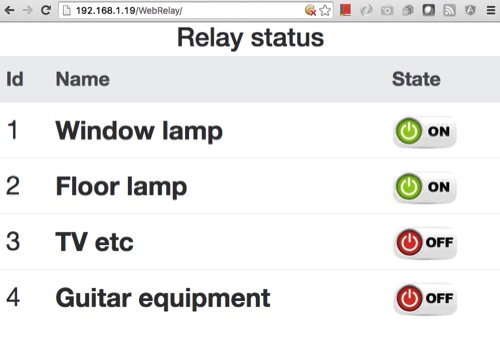
The final web app looks like the screen shot below and the controls are big enough to be handled on a mobile phone connected to your local home WiFi.
The complete code for this project is available on GitHub at:
https://github.com/LarsBergqvist/WebRelay

I have added a new post where I use a similar web app for controlling 433 MHz remote outlets. This is more safe than wiring your own relay boxes. https://larsbergqvist.wordpress.com/2016/05/15/rcswitch-revisited-control-rc-outlets-with-a-web-app/
LikeLike
hi Lars, Thankyou soo much for this great raspbian work. I need further help, i’m not getting how you linked the web to the RPi.
LikeLike
Hi Awais, I’m not sure that I understand your question, maybe you can specify your problem in more detail? The Raspberry Pi runs a web server that acts on the GPIO pins depending on the http put requests sent. The web server also supplies a web page where pressing a button makes a http put requests that turns a specified GPIO pin on or off. To access the web application you have to be on the same LAN network as the Raspberry Pi or use port forwarding in your router to access it outside the LAN.
LikeLike
I have installed this on my RPi 3B+. It does seem to run on the server side, but I get this error when I try to access from another computer on my LAN:
SERVER SIDE:
pi@raspopenvpn:~/WebAPI $ sudo python3 webrelay.py runserver
starting…
* Serving Flask app “webrelay” (lazy loading)
* Environment: production
WARNING: Do not use the development server in a production environment.
Use a production WSGI server instead.
* Debug mode: off
* Running on http://192.168.2.155:80/ (Press CTRL+C to quit)
192.168.2.118 – – [21/Aug/2020 11:18:50] “GET / HTTP/1.1” 404 –
CLIENT SIDE:
Not Found
The requested URL was not found on the server. If you entered the URL manually please check your spelling and try again.
Also, you have this in your description above:
To get a list with information about the defined relays:
curl -i http://myraspberry:80/WebRelay/api/relays
However, I do not see a WebRelay directory on my RPi. I only see a WebAPI directory but this does not have api/relays subdirectories. Can you explain this?
Thank you!
LikeLike
Hi! Do you get the code from https://github.com/LarsBergqvist/WebRelay.git or have you copy/pasted the code snippets from the blog? The repository from GitHub contain the routes needed for both serving up the UI and serving up the API backend.
The url:s do not map to folders. The routing in Flask with @app.route maps urls to different endpoints in webrelay.py.
From the browser, in your case you should use “http://192.168.2.155:80/WebRelay/”. This routes to row 22 in https://github.com/LarsBergqvist/WebRelay/blob/master/WebAPI/webrelay.py. This endpoint renders the html/js-page that is then returned to the browser.
The curl commands should contain the IP address of your RPI:
curl -i http://192.168.2.155:80/WebRelay/api/relays
I hope this helps.
LikeLike
Thanks for posting this Lars. Built a little Raspberry pi b+ and relay to turn on and off my gas fireplace. The remote eats batteries and is hit and miss even when it does work. Was able to find an app store app that sends HTTP requests so using that for now. Leveraged your code for the Pi. I added a momentary button to the GPIO and am going to write a little script that when the button is pushed it will call the current state and post the opposite. Should be pretty straightforward. Thanks again man.
LikeLiked by 1 person