
With an Arduino and some servos lying around, I find it hard not to try out something robot-like. An obstacle-avoiding mini car is probably one of the easiest projects to get started with and as our house is abundant with Lego, the building blocks for the construction are readily available.
The servos
I use two inexpensive mini servos that have continuous rotation. On these servos, the axis can not be moved to a specific angle, but the speed and direction can be voltage controlled.
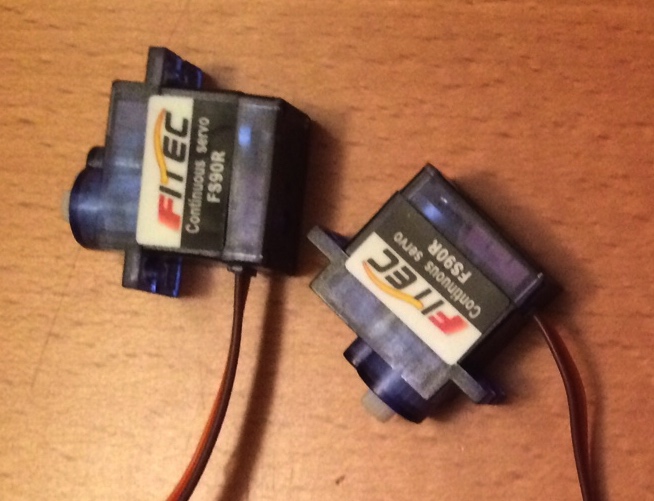
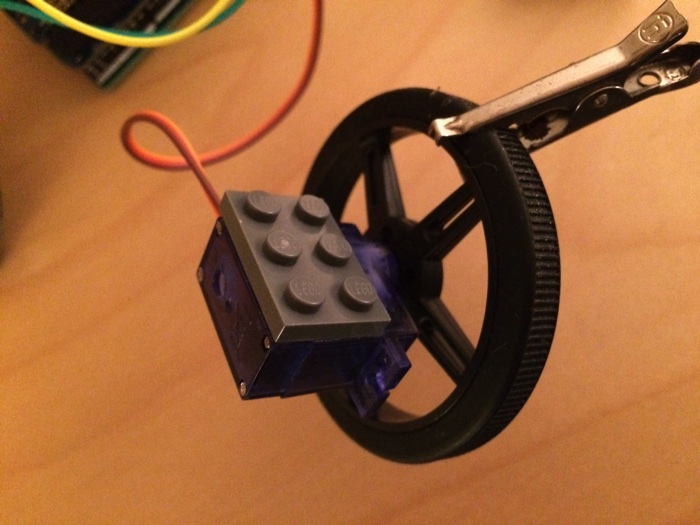
As wheels I first tried Lego wheels, but the friction against the floor was not sufficient, so I bought some rubber wheels that fit onto the FS90R servos.
To make the servos attachable to a Lego construction, I glued a 2×3 Lego plate on one side of each servo.
Other parts
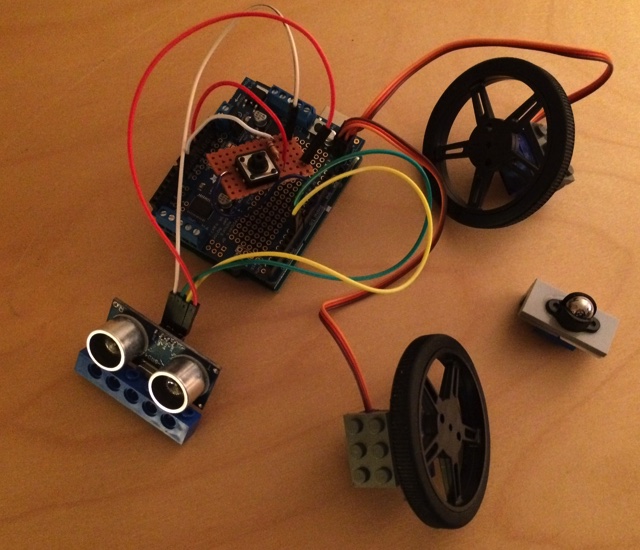
The base is an Arduino UNO which uses an Adafruit motor shield for driving the servos.
The “eyes” of the car is a SR-04 ultrasonic sensor that sends sonic pings and detects the echoes. From the echo it is possible to measure the distance to nearby objects. I have glued the sensor to a Lego brick so that it can be attached to the front of the car.
I use a simple pushbutton to toggle the car movement on/off. I use a circuit with a resistor so that I can detect a button press on one of the digital inputs on the Arduino.
The car has only two wheels (rear). For support in the front I use a steel ball in a housing that provides free rotation of the ball in any direction. I have glued the housing to a 2×4 flat Lego tile so that it can be attached to the car chassis.
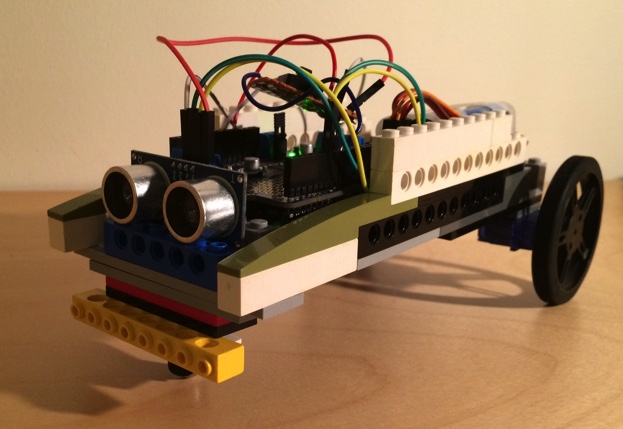
The assembled car
The power support for the Arduino, motor shield and servos is a 4×1.5 V battery pack. It is quite bulky, and the Lego car has a slot for it in the back compartment.

The final construction is an ugly bastard. But who cares, it works! 🙂 When the car detects a nearby obstacle, it goes into reverse with a left turn until there are no nearby objects.
The code
For servo control, I use the Arduino servo library. When it is used with a continuous rotation servo, servo.write(value) gives these results:
- value = 0: Full speed in one direction. Values 1-89 means decreased speed.
- value = 180: Full speed in the other direction. Values 179-91 means decreased speed.
- value = 90: stop the servo.
For my servos, the actual stop values were 88 or 89. With a value of 90, the servos got a very slow movement.
For the SR-04 sensor, I use the NewPing library. The cheap SR-04 is not very accurate, and it get some weird distance readings sometimes. NewPing’s ping_median() method helped a lot with this as it will send and detect multiple pings and return the median distance.
This file contains hidden or bidirectional Unicode text that may be interpreted or compiled differently than what appears below. To review, open the file in an editor that reveals hidden Unicode characters.
Learn more about bidirectional Unicode characters
| // ————————————————————————— | |
| // Sketch for a Lego car with two servos (with continuous rotation) for left | |
| // and right wheel and an SR04 ultra sonic sensor for measuring the distance to | |
| // objects in front of the car | |
| // ————————————————————————— | |
| #include <NewPing.h> | |
| #include <Servo.h> | |
| // | |
| // SR04 distance sensor setup | |
| // | |
| #define TRIGGER_PIN 6 // Arduino pin for trigger on sensor | |
| #define ECHO_PIN 7 // Arduino pin for echo on sensor | |
| #define MAX_DISTANCE 100 // Maximum distance (in centimeters) to detect | |
| NewPing sonar(TRIGGER_PIN, ECHO_PIN, MAX_DISTANCE); // NewPing setup of pins and maximum distance. | |
| unsigned long distance = 0; | |
| // | |
| // On/off button setup | |
| // | |
| #define BUTTON_PIN 8 | |
| bool runCar = false; | |
| // | |
| // Servo setup | |
| // | |
| #define RIGHT_WHEEL_PIN 10 | |
| #define LEFT_WHEEL_PIN 9 | |
| #define RIGHT_WHEEL_STOP_POSITION 88 | |
| #define LEFT_WHEEL_STOP_POSITION 89 | |
| Servo rightWheel; | |
| Servo leftWheel; | |
| void setup() | |
| { | |
| pinMode(BUTTON_PIN,OUTPUT); | |
| rightWheel.attach(RIGHT_WHEEL_PIN); | |
| leftWheel.attach(LEFT_WHEEL_PIN); | |
| Stop(); | |
| Serial.begin(115200); | |
| } | |
| void loop() | |
| { | |
| CheckButton(); | |
| if (runCar) | |
| { | |
| MeasureDistance(); | |
| OperateCar(); | |
| } | |
| delay(200); | |
| } | |
| void OperateCar() | |
| { | |
| if (distance > 0 && distance < 50) | |
| { | |
| BackwardsWithLeftTurn(); | |
| } | |
| else | |
| { | |
| Forward(); | |
| } | |
| } | |
| void CheckButton() | |
| { | |
| int buttonState = digitalRead(BUTTON_PIN); | |
| if (buttonState == HIGH) | |
| { | |
| if (!runCar) | |
| { | |
| runCar = true; | |
| } | |
| else | |
| { | |
| runCar = false; | |
| Stop(); | |
| } | |
| delay(500); | |
| } | |
| } | |
| void MeasureDistance() | |
| { | |
| int uS = sonar.ping_median(10); | |
| distance = uS / US_ROUNDTRIP_CM; | |
| Serial.println(distance); | |
| } | |
| void Forward() | |
| { | |
| Serial.println("Forward"); | |
| rightWheel.write(RIGHT_WHEEL_STOP_POSITION-10); | |
| leftWheel.write(LEFT_WHEEL_STOP_POSITION+10); | |
| } | |
| void BackwardsWithLeftTurn() | |
| { | |
| Serial.println("Backwards with turn"); | |
| rightWheel.write(RIGHT_WHEEL_STOP_POSITION+10); | |
| leftWheel.write(LEFT_WHEEL_STOP_POSITION+10); | |
| } | |
| void Stop() | |
| { | |
| Serial.println("Stop"); | |
| rightWheel.write(RIGHT_WHEEL_STOP_POSITION); | |
| leftWheel.write(LEFT_WHEEL_STOP_POSITION); | |
| } | |
This simple sketch does not make a “smart car”, but it can be extended with a more intelligent behavior. Feel free to download the repository for this project from https://github.com/LarsBergqvist/ArduinoLegoServoCar and try out some enhancements.
Let’s drive safely out there!
