
ESP8266 is a very popular and inexpensive WiFi-chip that can be a real contributor for taking small gadgets to the Internet. This post describes my first experiments with an Adafruit ESP8266-model.
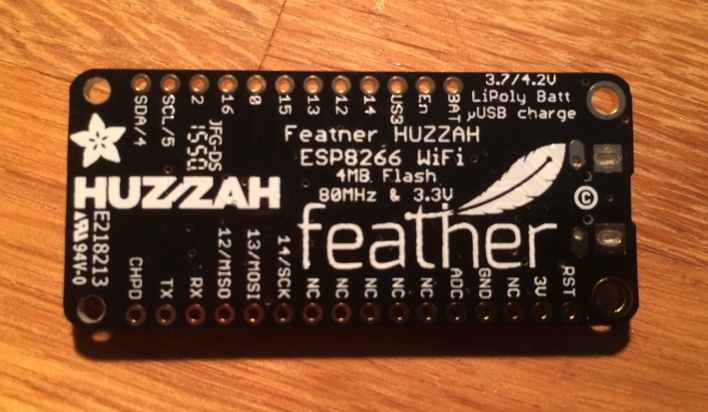
I recently bought an Adafruit Feather Huzzah ($18). It is build around ESP8266 which means WiFi-connectivity, but has some additional features compared to the simpler ESP8266 modules available:
- A USB-port for serial transfer and programming
- A battery connector that can also work as a charger
- A few digital inputs/outputs (3.3 V) and one analog input (1 V)
- With pins attached, they are positioned so that the Huzzah fits on a breadboard for easy experimental setups
- As always with Adafruit, the documentation and examples on their product pages are excellent
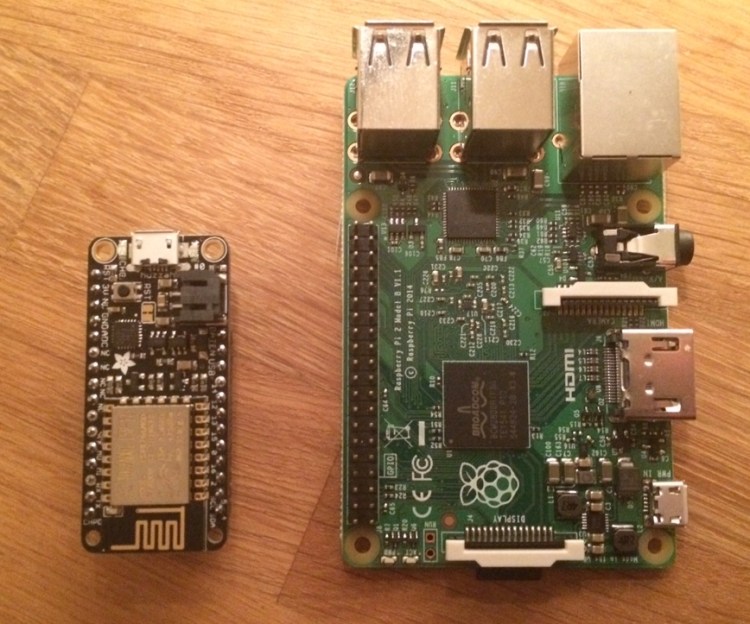
This makes programming the ESP8266 as easy as working with an Arduino. And yes, another benefit is that it’s cute (black, white, gold) and really, really small (51 x 23 x 8 mm, 6 grams).

Connecting to the Internet
With a WiFi hardware it is possible for the board to act as a web client and e.g. post measurements to a server. I will explore this in a later post by using MQTT. In this post I will demonstrate how the Huzzah can act as a web server and host a REST API.
In a previous post, https://larsbergqvist.wordpress.com/2016/03/09/control-your-home-with-a-raspberry-pi-and-a-mobile-phone/, I used a Raspberry Pi with a Python web server for remote controlling a set of relays. Let’s see if the Huzzah can handle the same job despite its size!
Code
For using the Feather Huzzah with the Arduino IDE, you need to install the ESP8266 board package. Adafruit has documented the steps here: https://learn.adafruit.com/adafruit-feather-huzzah-esp8266/using-arduino-ide
In this example I use two Arduino libraries:
- ESP8266 library – for setting up a WiFi-connection and a web server
- aREST library – a ready-to-use REST API for accessing GPIO pins
Out-of-the-box, aREST provides URI:s for accessing the pins on the Huzzah. It’s possible to make a custom API (see https://github.com/marcoschwartz/aREST for details), but in this example I will only work with the built-in API.
This file contains hidden or bidirectional Unicode text that may be interpreted or compiled differently than what appears below. To review, open the file in an editor that reveals hidden Unicode characters.
Learn more about bidirectional Unicode characters
| /* | |
| * This is an example sketch on using aREST with an Adafruit Feather Huzzah board | |
| * The sketch starts a web server and handles requests as REST calls via aREST | |
| * The board uses two relays on pins 12 and 13 that can be toggled via the REST API | |
| * Examples: | |
| * HuzzahIP/digital/12 -> returns the state of relay 1 | |
| * HuzzahIP/digital/13 -> returns the state of relay 2 | |
| * HuzzahIP/digital/12/0 -> turns relay 1 off | |
| * HuzzahIP/digital/12/1 -> turns relay 1 on | |
| * HuzzahIP/digital/13/0 -> turns relay 2 off | |
| * HuzzahIP/digital/13/1 -> turns relay 2 on | |
| */ | |
| #include <ESP8266WiFi.h> | |
| #include <aREST.h> | |
| // WiFi parameters | |
| #define SSID "YOUR_SSID" | |
| #define WIFI_PASSWORD "YOUR_WIFI_PWD" | |
| aREST rest = aREST(); | |
| #define LISTEN_PORT 80 | |
| WiFiServer server(LISTEN_PORT); | |
| #define RELAY1_PIN 12 | |
| #define RELAY2_PIN 13 | |
| void setup(void) | |
| { | |
| Serial.begin(115200); | |
| pinMode(RELAY1_PIN,OUTPUT); | |
| pinMode(RELAY2_PIN,OUTPUT); | |
| rest.set_id(""); | |
| rest.set_name("Lars' Feather Huzzah"); | |
| // Connect to WiFi | |
| WiFi.begin(SSID, WIFI_PASSWORD); | |
| while (WiFi.status() != WL_CONNECTED) | |
| { | |
| delay(500); | |
| Serial.print("."); | |
| } | |
| Serial.println(""); | |
| Serial.println("WiFi connected"); | |
| // Start the server | |
| server.begin(); | |
| Serial.println("Server started"); | |
| // Print the IP address | |
| Serial.println(WiFi.localIP()); | |
| } | |
| void loop() | |
| { | |
| WiFiClient client = server.available(); | |
| if (!client) | |
| { | |
| return; | |
| } | |
| while(!client.available()) | |
| { | |
| delay(10); | |
| } | |
| rest.handle(client); | |
| } |
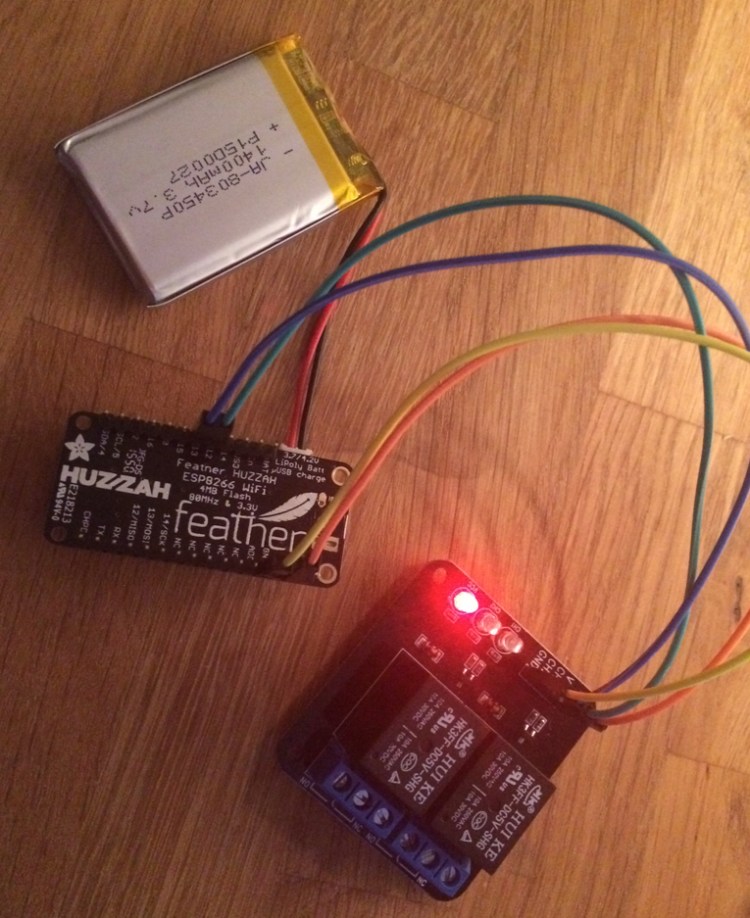
Wire up and test
I use pin 12 and 13 from the Huzzah as control signals for my relay module. VCC (3.3 V) and ground comes from the Huzzah as well. I go completely mobile by attaching a 3.7 V battery for powering the board.
I test the setup by sending requests from a browser on my WiFi network (The IP for the Huzzah appears in the serial monitor if you have the board connected via USB to the Arduino IDE).
HuzzahIP:80/digital/12
returns the state of relay 1 as JSON:
{
return_value: 0,
id: "",
name: "Lars' Feather Huzzah",
connected: true
}
HuzzahIP:80/digital/12/1
turns on relay 1 and returns the result as JSON:
{
message: "Pin D12 set to 1",
id: "",
name: "Lars' Feather Huzzah",
connected: true
}
And the other relay (pin 13) works as well and by requesting digital/12/0 and digital/13/0, the relays are turned off.
So, yes, the Huzzah can definitely replace the Raspberry for the purpose of providing remote controlled relays via a REST/WebAPI.
Verdict
Huzzah, huzzah, huzzah! I love this little board and I will definitely use it for further IoT experiments!
The code from this post can be downloaded from https://github.com/LarsBergqvist/Adafruit_Feather_Huzzah.

One thought