
OwnTracks is an open-source device tracker app for iOS and Android that lets you publish location data from your mobile phone. On the mobile app you can locate other connected devices on a map and get help navigating to the devices/friends/family members. With OwnTracks integrated in Home Assistant, you can create automation rules based on presence detection (for example, turn on the lights when someone gets home) or just keep an eye on where your youngsters (their phones) are from within the Home Assistant GUI.
What I really like about OwnTracks is that the creators encourages you to own and handle your private location data. Owntracks has a public broker but supports sending the location data with MQTT to your own private broker instead. To achieve this in my current home automation setup, I need to bridge an external broker with my within-LAN mosquitto broker that I use for my home automation.
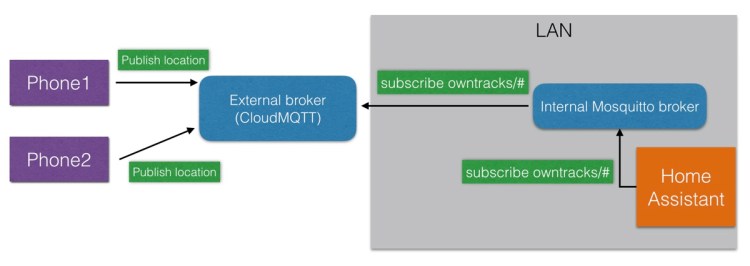
Overview
I have a mosquitto broker on my local LAN that uses the default settings with no password or encryption. IoT-devices and services within my LAN publish and subscribe to messages via this broker (typically sensor values and detection events). As all communication happens within my own network, data integrity is not a problem. Now I want to let selected devices outside the LAN communicates with my home system via MQTT. How to achieve this? Some possible alternatives could be:
- Port forward my internal broker through the firewall.
- Host an additional “external” broker at home that is only used for incoming Owntracks messages. Port forward this broker through the firewall. Bridge messages from this broker to the internal broker by letting the internal broker subscribe to topics on the external broker.
- Use a private MQTT cloud broker. Bridge messages from this broker to the internal broker by letting the internal broker subscribe to topics on the external broker.
As I don’t want to reconfigure all my existing within-LAN-devices with TLS, certificates and passwords, option (1) is not a good alternative. Option (2) and (3) lets me keep my existing configurations while still allowing Owntracks messages into my system.

Mosquitto on Raspberry Pi
My Mosquitto setup runs on Raspberry Pi computers with Raspian OS. You can install Mosquitto with apt-get, but as the default source list on Raspbian will not get the latest Mosquitto that is needed for bridging brokers, an alternative source has to be used. This tutorial shows how to set it up:
http://www.switchdoc.com/2016/02/tutorial-installing-and-testing-mosquitto-mqtt-on-raspberry-pi/
Bridging Mosquitto brokers
In this example I use a mosquitto broker with default configuration (no security) on my local LAN on a Raspberry Pi with IP 192.168.1.16. I use a separate mosquitto broker on a different Raspberry Pi with IP 192.168.1.17. The second mosquitto instance is open through the firewall and mosquitto is setup with password protection and is only used for Owntracks messages. The security could be increased further by using encryption with TLS, but as self-signed certificates is a mess with iPhones (that I want to connect with the broker), I’ve decided to accept unencrypted data.
To get the Owntracks messages from the external mosquitto broker to the internal broker, I setup the internal broker to subscribe to owntracks/# topics from the external broker. This is achieved with a bridge configuration in mosquitto.conf (typically located in /etc/mosquitto/mosquitto.conf) for the internal broker:
#
# Subscribe to owntracks topics from an external broker
#
connection external_broker
address 192.168.1.17:1883
remote_username USERNAME
remote_password PASSWORD
topic owntracks/# in 0
When I used the default source list for apt-get on Raspbian I could not get this to work. apt-get would download mosquitto version 1.3.4 and this version would not recognize remote_username and remote_password. With the new source list, apt-get will install a newer mosquitto (version 1.4.11 in my case), which understands these parameters.
To test that the bridging works, you can open up two terminal windows on a LAN-connected computer that has mosquitto-clients installed (install with apt-get install mosquitto-clients). In the first window, we subscribe to owntracks topics from the internal broker:
mosquitto_sub -h 192.168.1.16 -t "owntracks/#" -v
In the second window, we publish an owntracks message to the the external broker:
mosquitto_pub -h 192.168.1.17 -t "owntracks/test" -m "testing bridge" -u USERNAME -P PASSWORD
If the bridging is correctly setup, the first window should show this output:
owntracks/test testing bridge
That is, the message has been sent to the external broker and been forwarded to the internal broker. To make the external broker instance available outside the LAN, you need to use port-forwarding in your router (consult your router manual for this step).
Using a cloud service for MQTT
An alternative to hosting an additional broker yourself is to use a cloud service. CloudMQTT has a free plan for up to 10 connections (with limited bandwidth). On CloudMQTT you get a set of private ports on a cloud instance of an MQTT broker. You can add users/passwords for different topics and directions of data.
The bridging setup for making the internal broker subscribe to Owntracks-topics from the CloudMQTT broker is the same as when hosting the external broker yourself. Just replace the address, port and credentials so that it matches your CloudMQTT-broker.
Owntracks on iOS and Android
Owntracks can be downloaded for free from iOS AppStore for iPhone and Google Play for Android. To configure the app you need to switch to private mode and configure the settings to your own broker. For iOS:

You can test the setup by keeping a mosquitto_sub running on a computer and watch the output. You should get something like:
>mosquitto_sub -h BROKERADDRESS -p PORT -t "owntracks/#" -v -u USERNAME -P PASSWORD
owntracks/USERNAME/iphone {"t":"p","tst":1491174365,"acc":65,"_type":"location","alt":20,"lon":17.69113864217852,"vac":10,"lat":59.51129349159042,"batt":96,"conn":"w","tid":"NE"}
Home Assistant
Home Assistant has a nice Owntracks integration that shows the Owntracks-connected devices on a map. See this page on how to set it up and use it;
https://home-assistant.io/components/device_tracker.owntracks/
When Owntracks is activated in Home Assistant, it listens to Owntracks messages from an MQTT broker. From the sub topic of an incoming Owntracks message, a device_tracker entity is created, for example:
device_tracker.my_iphone
This entity can then be rendered in the GUI or used for automation rules based on presence detection. Home Assistant uses “zones” for defining regions on earth. By default you have a home zone that is created from the latitude and longitude that you have set up in configuration.yaml. Other zones can be added by using zone settings:
This file contains hidden or bidirectional Unicode text that may be interpreted or compiled differently than what appears below. To review, open the file in an editor that reveals hidden Unicode characters.
Learn more about bidirectional Unicode characters
| zone 1: | |
| name: Work (Lars) | |
| latitude: 61.422185 | |
| longitude: 18.560426 | |
| radius: 100 | |
| icon: mdi:worker | |
| zone 2: | |
| name: School | |
| latitude: 61.494772 | |
| longitude: 18.72384 | |
| radius: 300 | |
| icon: mdi:chair-school | |
| group: | |
| tracker_group: | |
| name: Tracker group | |
| entities: | |
| – device_tracker.my_iphone | |
| – device_tracker.my_nexus |
When HA gets an Owntracks message from a device it will change the state of the device_tracker identity to the name of the zone if within a specified zone or “not home” if not within any of the zones.
Showing the entity state in the HA GUI
With a group containing device tracker entities, you can display the trackers in the HA GUI like:
![]()
Creating a presence detection rule
With Home Assistant’s rule system, you can define automations based on presence detection of the Owntracks-connected devices. For example, to turn on the windows lights when I get home, I could use an automation rule like this one:
This file contains hidden or bidirectional Unicode text that may be interpreted or compiled differently than what appears below. To review, open the file in an editor that reveals hidden Unicode characters.
Learn more about bidirectional Unicode characters
| automation: | |
| – alias: Turn on window lights when Lars gets home | |
| trigger: | |
| platform: zone | |
| entity_id: device_tracker.my_iphone | |
| zone: zone.home | |
| event: enter | |
| action: | |
| service: switch.turn_on | |
| entity_id: group.window_lights |
