
In the quest for getting my kids interested in coding, I’ve decided to make them a message controlled bot car with Lego bricks and an ESP8266 board. The idea is to have an environment where we can jointly program a sequence of actions that can be sent via WiFi to the bot for execution. With this setup we can make challenges like creating the optimal sequence for navigating through a maze or simply try out crazy movements & mayhem just for the fun of it. Hopefully, having an assignment were you need to connect an abstraction like a sequence of symbols with a physical object will ignite a spark of interest for electronics and the basics of programming.
This post describes the first part of this project. I will use Lego bricks and some servos to build a car bot and mount an ESP8266 board loaded with MicroPython. To begin with, the bot will be controlled via WiFi through MicroPython’s WebREPL.
Parts needed
To create the first version of the bot, these parts are needed:
- An Adafruit Feather Huzzah + 3.7V LiPo battery
- An Adafruit Servo FeatherWing
- A 4xAA battery pack for the servo board (for a total of 6V for the servos)
- Optional: an Adafruit FeatherWing doubler
- Two continuous rotating micro servos (FS90R) and wheels
- Three standard micro servos (SG90) for controlling the weapons
- A caster ball as front “wheel”
- Some assorted Lego bricks
- Wires and glue (yup, dad will use the Kragle on the kids’ Lego. But only on a few bricks…)
Building the bot
The first version of the bot does not have to be pretty, it just needs to be functional and be able to house the microprocessor board, servos and the batteries. Lego mini-figures are optional.
We’ll need a Huzzah board and a FeatherWing with a servo driver. I use a FeatherWing doubler to connect the Huzzah and the FeatherWing (the servo board can also be stacked on top of the Huzzah with appropriate headers):

I will use two continuous rotation servos (with servo wheels) and three standard micro servos for the bot’s weapons. The Kragle fixes 2×3 bricks to the servos.

To power the Huzzah, I use a 3.7V LiPo battery. The servos need a separate power source. I use 4xAA batteries in a box.

Finally, we need some Lego parts. More job for the Kragle. I have glued the caster ball to a flat 4×2 brick (in turn glued to a 4×2 normal brick) and also fixated three servo horns to Lego bricks.

The big battery box goes under the bot and the servos, boards and 3.7V battery is put on top.


PWM servo basics
An analogue Pulse-Width-Modulation servo is controlled by a signal where the width of the pulses controls the angle of rotation of the motor axis. A typical servo can rotate the axis between 0 and 180 degrees with control signals in the ms range. A continuous rotation servo is a modified standard servo where the feedback loop has been removed. In these servos, the pulse width will define the speed and direction of the rotation. With a servo library, you would typically get no movement when sending 90 degrees to a continuous rotation servo and increasing speeds in one direction with degrees 89-0 and increasing speeds in the other direction with degrees 91-180.
Calibrating the servos
The FS90R servo has an accessible potentiometer that controls what pulse width that defines “stop”. On my inexpensive micro servos, the potentiometer drifts easily, so frequent adjustments are needed.
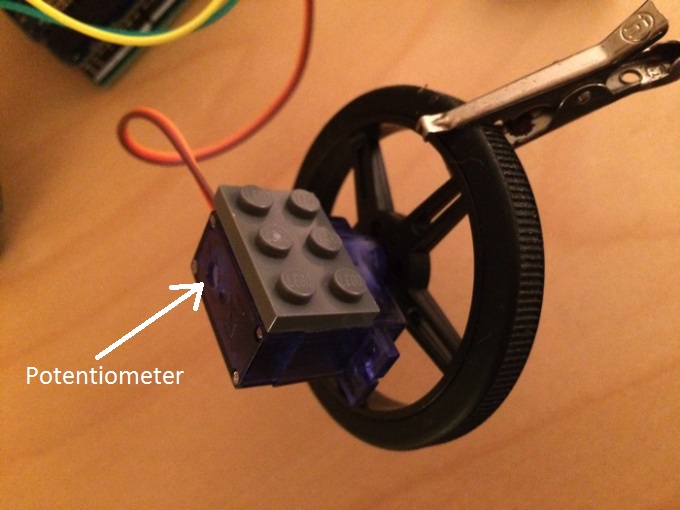
I have mounted rubber wheels (for traction) and glued 2×3 Lego bricks (for attachment purposes) on the servos.
Powering the servos
The ESP8266/Huzzah-board will not be able to provide enough current for running the servos directly. Thus a separate power supply with a driver is needed and the Huzzah will only provide the control signals. You could wire up an H-bridge for this purpose, but I use a FeatherWing servo board with i2C-communication that fits directly on the Huzzah (or beside it when using a FeatherWing doubler).
Servos with MicroPython
Adafruit has a MicroPython library that can be used with the FeatherWing for accessing the servos:
https://github.com/adafruit/micropython-adafruit-pca9685/releases
You will need to download pca9685.mpy and servo.mpy and transfer them to the board with ampy.
MicroPython basics
For this project, MicroPython needs to be flashed on the ESP8266/Adafruit Huzzah. I use version 1.8.5 of MicroPython for ESP8266. Adafruit has several tutorials on how to flash and use MicroPython with an ESP8266 board:
https://learn.adafruit.com/micropython-basics-how-to-load-micropython-on-a-board/esp8266?view=all
To program the board I use Visual Studio Code on a Mac Book Air for typing Python scripts and Adafruit’s ampy tool for uploading the scripts:
https://github.com/adafruit/ampy
To program the the board via WiFi, I use MicroPython’s WebREPL:
https://learn.adafruit.com/micropython-basics-esp8266-webrepl/access-webrepl?view=all
Programming the bot
I want the bot to act on a sequence of action commands. To keep it simple, an action can be defined as a single character and a whole sequence can be a string. For example, to move forward two steps, turn right, move forward one step and then turn left, the command string would be:
FFRFL
To lift and lower the front weapon (hammer) and open and close the side weapons (claws), I would use:
UDOC
(Up, Down, Open, Close)
So, I need a Python method that takes a string as an argument, iterates over each character and then performs an action depending on that character. This is accomplished with a dictionary that maps between characters and object methods.
This file contains hidden or bidirectional Unicode text that may be interpreted or compiled differently than what appears below. To review, open the file in an editor that reveals hidden Unicode characters.
Learn more about bidirectional Unicode characters
| action_methods = { | |
| 'F' : wheels.fw_step, | |
| 'B' : wheels.back_step, | |
| 'L' : wheels.turn_left, | |
| 'R' : wheels.turn_right, | |
| 'S' : wheels.stop, | |
| 'U' : hammer.up, | |
| 'D' : hammer.down, | |
| 'O' : claws.open, | |
| 'C' : claws.close | |
| } | |
| def run(sequence): | |
| for action in sequence: | |
| if action in action_methods: | |
| action_methods[action]() |
The action implementations
Forward- and backward movements are created by rotating the wheels in the same direction. But as the wheels are mounted on opposite sides of the vehicle, the programmed directions through the servo library are actually opposite:
This file contains hidden or bidirectional Unicode text that may be interpreted or compiled differently than what appears below. To review, open the file in an editor that reveals hidden Unicode characters.
Learn more about bidirectional Unicode characters
| def stop(): | |
| """Stops the wheels""" | |
| servos.position(left_wheel, degrees=90) | |
| servos.position(right_wheel, degrees=90) | |
| def fw_step(): | |
| """Moves the bot forward one step""" | |
| servos.position(left_wheel, degrees=90 + wheel_speed) | |
| servos.position(right_wheel, degrees=90 – wheel_speed + drift) | |
| utime.sleep(straight_length) | |
| stop() | |
| def back_step(): | |
| """Moves the bot backwards one step""" | |
| servos.position(left_wheel, degrees=90 – wheel_speed) | |
| servos.position(right_wheel, degrees=90 + wheel_speed + drift) | |
| utime.sleep(straight_length) | |
| stop() |
Left- and right turns are created by rotating the wheels in opposite directions and the weapons are controlled by standard micro servos that can rotate between 0 and 180 degrees.
The complete implementation exists in a Bot class that aggregates a Wheels-, a Hammer- and a Claws object. Each helper object defines the behaviour of their particular servo(s).
The code for the Bot class looks like this:
This file contains hidden or bidirectional Unicode text that may be interpreted or compiled differently than what appears below. To review, open the file in an editor that reveals hidden Unicode characters.
Learn more about bidirectional Unicode characters
| """ | |
| A bot with servos for an Adafruit Feather Huzzah | |
| Requires the Adafruit PWM servo library: | |
| https://github.com/adafruit/Adafruit-PWM-Servo-Driver-Library | |
| Uses a FeatherWing servo board attached with i2C | |
| """ | |
| import machine | |
| import servo | |
| import utime | |
| from wheels import Wheels | |
| from hammer import Hammer | |
| from claws import Claws | |
| class Bot(object): | |
| """ | |
| A robot car with two continuous servos as wheels | |
| and three standard servos as weapons (hammer and claws) | |
| """ | |
| def __init__(self): | |
| # Setup pins to use for i2c and create the servos object | |
| i2c = machine.I2C(machine.Pin(5), machine.Pin(4)) | |
| servos = servo.Servos(i2c) | |
| # Create the the servo controlled parts of the bot | |
| # and assign the control pins to use | |
| self.wheels = Wheels(servos, 0, 1) | |
| self.hammer = Hammer(servos, 5) | |
| self.claws = Claws(servos, 7, 6) | |
| # A mapping between each command and the | |
| # corresponding method on the servo objects | |
| self.action_methods = { | |
| 'F' : self.wheels.fw_step, | |
| 'B' : self.wheels.back_step, | |
| 'L' : self.wheels.turn_left, | |
| 'R' : self.wheels.turn_right, | |
| 'S' : self.wheels.stop, | |
| 'U' : self.hammer.up, | |
| 'D' : self.hammer.down, | |
| 'O' : self.claws.open, | |
| 'C' : self.claws.close | |
| } | |
| def run(self, sequence): | |
| """ | |
| Input is a string where each character | |
| represents an action. Each action is executed according | |
| to the defined action method mapping | |
| """ | |
| for action in sequence: | |
| if action in self.action_methods: | |
| self.action_methods[action]() |
The code for the other classes are available in GitHub: https://github.com/LarsBergqvist/micropython_lego_bot
Testing the bot
The ingenious WebREPL let’s you have a Python prompt in a browser that directly communicates with the ESP8266. It lets you upload scripts remotely that you can import in the REPL and work with.
I assume that you have setup the ESP8266 with MicroPython WebREPL (see the previously mentioned tutorial link from Adafruit) and also uploaded the Adafruit mpy files for the servo library and the bot.py, claws.py, hammer.py and wheels.py files from my GitHub repository to the board with ampy. Then we can connect to the ESP8266’s access point and start the WebREPL. After logging in we can try out the bot:

Calibration and live editing of properties
As the mechanics of the servos and the attached wheels is not top of the line, it is hard to get perfect movements (like a forward movement along a straight line). Thus, I have some calibration parameters in my script that I use for adjusting the movements for a particular setup. When working via the MicroPython WebREPL it is easy to change the parameters on-the-fly:
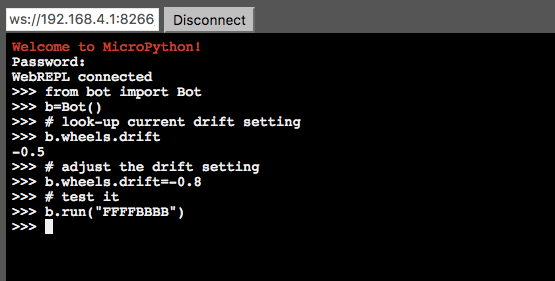
This would be very tedious work if every change had to go through a compile-flash-load sequence with a compiled language. With MicroPython you can make these changes instantly as it is an interpreted language. Have I mentioned that I love embedded programming with wireless MicroPython?
Possible enhancements
My inexpensive micro servos are not very accurate, nor powerful. It would be interesting to test the setup with more advanced hardware in the future. The FeatherWing servo board has eight servo connections in total, so adding a few more servos for some creative animation could also be a possible enhancement.
Next steps
The next step in my project is to do the bot communication via MQTT. This way, any device on the same network as the bot will be able to send command sequences. Ultimately, I want a REST backend that sends out the commands with the MQTT protocol and a simple HTML front end where the user can define the command sequence. More on this in a later post.
All code for this project is available in GitHub: https://github.com/LarsBergqvist/micropython_lego_bot
