
Recently I’ve had problems with my Raspberry Pi 3 overheating though I use a heat sink for the processor and have a very modest load on the machine. When the RPi is in this state, it shows a thermometer warning icon and it is not possible to login. As I can not access the machine, it is hard to investigate the cause of the heat problem (if a process has gone totally wild e.g.). The only way to resolve this is to do a hard reboot (then the temperature goes down again).
To investigate this further, I want to monitor the CPU temperature without accessing the RPi via ssh or a direct login. My idea is to let the RPi gather board temperature values regularly and then publish these via MQTT. An MQTT subscriber will see to that the measurements are propagated to a cloud service so that I can monitor the values in an external application. With IFTTT I can add alerts on the measurements (e.g. when the CPU temperature goes over 60 C, an e-mail should be sent to me). This way I will be notified before the temperature/load gets too high and I will hopefully be able to intercept the problem by logging in to the machine before it locks up.
Solution overview
I will add a Python script that is scheduled with cron to start every ten minutes. The script checks the CPU temperature, formats the data and publishes the value via a local MQTT broker (mosquitto). I use an existing Python service (developed in A self-hosted MQTT environment for Internet of Things – Part 3) as an MQTT subscriber that forwards the data to a cloud service (Adafruit IO).
The data can then be monitored via the Adafruit IO web dashboard or via a mobile app (I use DataFeeds on iOS which works fine for my purposes).
I have setup an rule in IFTTT (IF This Then That), that sends me an iOS notification when the measurement value exceeds a certain limit.
Getting the CPU temperature from a Raspberry Pi
The vcgencmd command can be used for getting Raspberry Pi-specific properties. To get the broadcom chip temperature, the measure_temp argument is used:
vcgencmd measure_temp
This will return a string like Temp=42.4’C.
Setting up the measurement Python script
As I want to publish the temperature, I use a Python script to execute the vcgencmd and then format it. This tutorial shows how it can be done:
https://www.raspberrypi.org/learning/temperature-log/worksheet/
As in the tutorial, I use subprocess.check_output() to execute the command and then a regular expression to extract the actual value from the returned string.
This file contains hidden or bidirectional Unicode text that may be interpreted or compiled differently than what appears below. To review, open the file in an editor that reveals hidden Unicode characters.
Learn more about bidirectional Unicode characters
| #!/usr/bin/env python3 | |
| from subprocess import check_output | |
| from re import findall | |
| def get_temp(): | |
| temp = check_output(["vcgencmd","measure_temp"]).decode("UTF-8") | |
| return(findall("\d+\.\d+",temp)[0]) | |
| print(get_temp()) |
After the temperature value is fetched, I connect to my local MQTT broker and publish a message on the Home/RPI3/Temp topic.
This file contains hidden or bidirectional Unicode text that may be interpreted or compiled differently than what appears below. To review, open the file in an editor that reveals hidden Unicode characters.
Learn more about bidirectional Unicode characters
| #!/usr/bin/env python3 | |
| import paho.mqtt.publish as publish | |
| from subprocess import check_output | |
| from re import findall | |
| def get_temp(): | |
| temp = check_output(["vcgencmd","measure_temp"]).decode("UTF-8") | |
| return(findall("\d+\.\d+",temp)[0]) | |
| def publish_message(topic, message): | |
| print("Publishing to MQTT topic: " + topic) | |
| print("Message: " + message) | |
| publish.single(topic, message, hostname="192.168.1.16") | |
| temp = get_temp() | |
| publish_message("Home/RPI3/Temp", temp) |
The script is setup to run once every 10 minutes with cron:
crontab -e
(add a row like this one):
*/10 * * * * /home/myuser/mypath/measurecputemp.py
Note that the py-file needs to start with a Python shebang (#!/usr/bin/env python3) and the file needs to have execution rights set (use chmod ugo+x measurecputemp.py).
Routing the data to Adafruit IO
The temperature is published as a message to my local MQTT broker. I have a subscriber that acts as proxy for forwarding the data to Adafruit IO. I use this subscriber for most of the messages that I publish from my MQTT devices at home. I have described this subscriber in more detail in a previous post:
A self-hosted MQTT environment for Internet of Things – Part 3
This Python script is setup to run as a service as described in:
This file contains hidden or bidirectional Unicode text that may be interpreted or compiled differently than what appears below. To review, open the file in an editor that reveals hidden Unicode characters.
Learn more about bidirectional Unicode characters
| #!/usr/bin/env python3 | |
| import paho.mqtt.client as mqtt | |
| import datetime | |
| import time | |
| from Adafruit_IO import MQTTClient | |
| from adafruit_credentials import ADAFRUIT_IO_USERNAME, ADAFRUIT_IO_KEY | |
| from mylogger import logger | |
| # | |
| # Subscribes to messages via a local MQTT broker | |
| # and forwards them to a cloud service (Adafruit IO) | |
| # | |
| def on_connected(client, userdata, flags, rc): | |
| print("Connected to local MQTT broker with result code "+str(rc)) | |
| client.subscribe("Home/#") | |
| def on_disconnected(client,userdata,rc): | |
| print("Disconnected from local MQTT broker") | |
| try_connect_to_local_broker(client) | |
| def adafruit_connected(client): | |
| print("Connected to Adafruit IO") | |
| def on_message(client, userdata, msg): | |
| print(str(datetime.datetime.now()) + ": " + msg.topic + " " + str(msg.payload)) | |
| # | |
| # Forward the data to Adafruit IO. Replace topic with a valid feed name | |
| # | |
| feedname=msg.topic.replace("/","_") | |
| print("Publish to Adafruit feedname: " + feedname) | |
| # Initialize the client that should connect to io.adafruit.com | |
| adafruitClient = MQTTClient(ADAFRUIT_IO_USERNAME, ADAFRUIT_IO_KEY,service_port=1883) | |
| adafruitClient.on_connect = adafruit_connected | |
| adafruitClient.connect() | |
| adafruitClient.loop() | |
| adafruitClient.publish(feedname,msg.payload) | |
| adafruitClient.disconnect() | |
| def try_connect_to_local_broker(client): | |
| print("trying to connect to local broker") | |
| connOK=False | |
| while(connOK == False): | |
| try: | |
| client.connect("192.168.1.16", 1883, 60) | |
| connOK = True | |
| except: | |
| connOK = False | |
| time.sleep(2) | |
| while(True): | |
| # | |
| # Initialize the client that should connect to the local MQTT broker | |
| # | |
| try: | |
| client = mqtt.Client() | |
| client.on_connect = on_connected | |
| client.on_disconnect = on_disconnected | |
| client.on_message = on_message | |
| try_connect_to_local_broker(client) | |
| # Blocking loop to the local Mosquitto broker | |
| client.loop_forever() | |
| except: | |
| print("Failed connection to local MQTT broker"); | |
| time.sleep(10) |
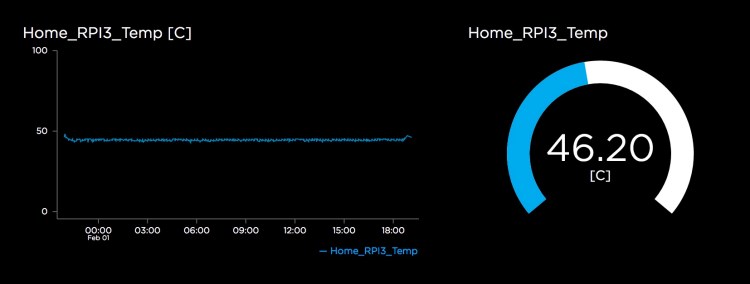
The data can then be monitored on the Adafruit IO dashboard:
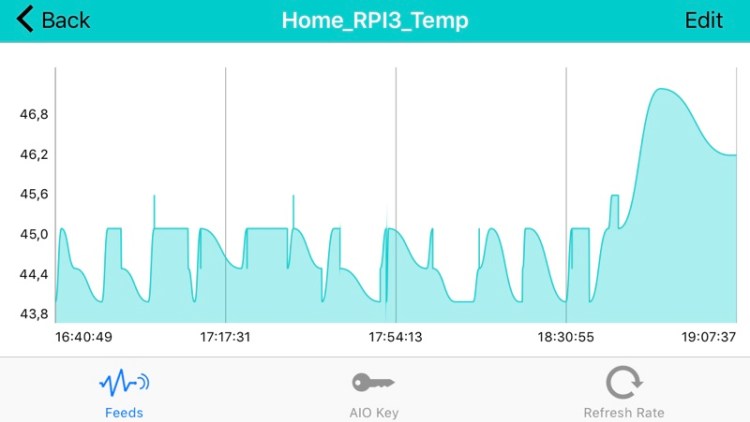
Monitoring the data with a mobile app
I use the free and excellent DataFeeds app by MonoHelix Labs for viewing my Adafruit IO feeds on iOS. You can get it from here:
https://itunes.apple.com/us/app/datafeeds-feed-monitor-for/id1163614771?mt=8
Setting up an applet/rule with IFTTT
With an account on IFTTT, it is possible to connect to your Adafruit IO account and act on changes in the feed data. I have setup an applet that gives me notifications on my mobile phone when the RPi-temperature is greater or equal to 60 C.

Adding additional measurements
While at it, I add measurements for disk-, memory and CPU-usage as well. These measurements can be fetched with the psutil library. I have made a new Python script that gets these values (and the CPU temp) and transforms them to MQTT messages. The script takes one argument that can be specified as the name of the computer that is measured, e.g. RPI3, RPI2. This way I can easily use the script on all my Raspberry Pi:s.
This file contains hidden or bidirectional Unicode text that may be interpreted or compiled differently than what appears below. To review, open the file in an editor that reveals hidden Unicode characters.
Learn more about bidirectional Unicode characters
| #!/usr/bin/env python3 | |
| import paho.mqtt.publish as publish | |
| from subprocess import check_output | |
| from re import findall | |
| import psutil | |
| import sys | |
| def get_temp(): | |
| temp = check_output(["vcgencmd","measure_temp"]).decode("UTF-8") | |
| return(findall("\d+\.\d+",temp)[0]) | |
| def get_disk_usage(): | |
| return str(psutil.disk_usage('/').percent) | |
| def get_memory_usage(): | |
| return str(psutil.virtual_memory().percent) | |
| def get_cpu_usage(): | |
| return str(psutil.cpu_percent(interval=None)) | |
| def publish_message(topic, message): | |
| print("Publishing to MQTT topic: " + topic) | |
| print("Message: " + message) | |
| publish.single(topic, message, hostname="192.168.1.16") | |
| if __name__ == '__main__': | |
| if len(sys.argv) != 2: | |
| print("Specify a computer name as argument to " + __file__) | |
| sys.exit(2) | |
| computer_name = sys.argv[1] | |
| print("Doing measurements for: " + computer_name) | |
| publish_message("Home/" + computer_name + "/Temp", get_temp()) | |
| publish_message("Home/" + computer_name + "/DiskUsagePercent", get_disk_usage()) | |
| publish_message("Home/" + computer_name + "/MemoryUsagePercent", get_memory_usage()) | |
| publish_message("Home/" + computer_name + "/CpuUsagePercent", get_cpu_usage()) | |
To use this script with cron, set execution rights on the file and specify the schedule with crontab:
*/10 * * * * /home/myuser/mypath/systemmonitor.py RPI3

Good morning!
There is something that I didn’t understand: The script that sends the data do Adafruit is called periodically as well as the script that collect the data? Or it stays running in background always?
Luiz
LikeLike
Hi Luiz,
The script that collects data is scheduled with cron to be executed every 10 minutes. It publishes the data to a local MQTT broker. The MQTT broker is always running (as a service). I have several MQTT subscribers that are also always running (as services) and they listen to messages sent to the broker. One of the services filters out specific MQTT topics and sends the message data to Adafruit IO.
I have a separate post that describes how to make the Python scripts run as services on Raspberry Pi: https://larsbergqvist.wordpress.com/2016/06/18/daemonize-that-python-script/
LikeLike
Thanks for the script.
Worked great for me, except that the cpu load was every time almost 100% on my raspberry 2B.
This because python was using at the moment the measuring was done a lot of cpu himself.
Did some sleeping so the cpu can settle down again and now the load is most of the time 4%, that will match with TOP.
time.sleep(5)
cu = get_cpu_usage()
publish_message(“Home/” + computer_name + “/Temp”, get_temp())
publish_message(“Home/” + computer_name + “/DiskUsagePercent”, get_disk_usage())
publish_message(“Home/” + computer_name + “/MemoryUsagePercent”, get_memory_usage())
publish_message(“Home/” + computer_name + “/CpuUsagePercent”, cu)
LikeLike
Great improvement, thanks!
LikeLike
Hello! I want to read temp at one RPi and send it to the another Rpi – where I have HomeAssistant. Can you please tell me how to send the data? I have done the part printcputemo + measurecputemp. BIG THANKs!
LikeLike
Hi Filip! You can use the paho mqtt library in Python as described in the last listing in this blog post (systemmonitor.py). Change the hostname in the publish.single-call to an IP-address of an MQTT broker that HomeAssistant uses. You can read about how to setup an MQTT broker for HomeAssistant here: https://www.home-assistant.io/docs/mqtt/broker
So your script will publish data to an MQTT broker. HomeAssistant can then use an MQTT sensor that listens to to the topic of that data (https://www.home-assistant.io/integrations/sensor.mqtt/)
LikeLike
Hi, thank you for your tutorial,
Some Things, where i got issues:
You need to install the required Libs over pip / pip3 depend on python version.
First you need pip 🙂
===
Python 2:
sudo apt install python-pip
Python 3:
sudo apt install python3-pip
After pip installations you can install the required libs (required)
pip install paho-mqtt
pip install psutil
===
For the crontab on raspbian buster you need to change:
/usr/bin/python /home/pi/scriptname.py mydevicename
if you wish to log, you can also add ” >> and log file”
/usr/bin/python /home/pi/scriptname.py mydevicename >> /home/pi/myscript.log
Not set up the crontab to sudo user the script, you will get some permissions issued by executing.
thank you stoffl
LikeLike
Thanks for good feedback!
LikeLike
How do I specify the computer name in sys.argv?
LikeLike
The first argument to the script is used as a computer_name variable. You can hard code a name when calling the script like “systemmonitory.py mycomputername” or, if on a linux-like OS, use the $HOSTNAME environment variable like “systemmonitor.py $HOSTNAME”
LikeLike
thanks, great script.. is there way to to input a username and password for the MQTT broker
LikeLike
Hi, thanks for reading! I have not worked on this script for many years and I don’t use authentication for my MQTT broker. But from what I can see when searching for examples, you should create an mqtt client and set the username/password with the username_pw_set method. Something like (I have not tested this myself, though):
client = mqtt.Client()
client.username_pw_set(“your_username”, “your_password”)
client.connect(“broker_address”, 1883)
client.publish(topic, “Hello MQTT”)
LikeLike