
I’ve been searching for an easy-to-get-started home automation platform that can be extended and customized as my needs grow. After struggling with OpenHAB, Domoticz and Freedomotic, I’ve found Home Assistant to be a much better fit for me. My main requirements are that the system should be open-source, have good tutorials & documentation, work well on a Raspberry Pi and be extensible for my likely future needs. I will spend this and a few upcoming posts with my Home Assistant experiments.
About Home Assistant
Home Assistant is an open-source Python 3-based home automation platform. It can be used for integrating with devices and systems using several different protocols like z-wave, mqtt, rest/http, command line tools etc. The configuration is done in yaml-files and automation can be done by specifying triggers, conditions and actions. There are lots of available components from the Home Automation community:
https://home-assistant.io/components/
and it is possible to write your own custom components in Python.
Why Home Assistant?
I have some actuators and sensors at home that I control and monitor via services running on a Raspberry Pi. I want to use Home Assistant for consolidation of these services and data in one place. I also want to use Home Assistant for future extensions of my smart home using z-wave.
My first goal with HA is to integrate my existing sensors and actuators:
- Read my existing MQTT messages (from sensors)
- Trigger my 433 MHz outlets (via an existing REST service)
- Inline existing web apps (like my sensor graphs)
- Connect to my USB security cam
- Connect to my RPi Cam
My upcoming goal is to integrate new devices and services like:
- Z-wave devices like a Fibaro flood sensor
- OwnTracks (to track when a family member enters or exits a zone)
Installing Home Assistant on a Raspberry Pi
I use a Raspberry Pi 2 with Raspbian OS for my Home Assistant installation. I’ve opted for using a Python virtual environment with a dedicated Home Assistant user as described in this tutorial:
https://home-assistant.io/getting-started/installation-virtualenv/
I had no problems with the installation. After HA is started, I can browse the system from:
http://ipadress:8123
The application’s GUI scales well on a mobile phone, so accessing the system from a desktop shortcut on an iPhone works fine.
The configuration file for Home Assistant on a Raspberry Pi (based on the tutorial mentioned above) is located in:
~/.homassistant/configuration.yaml
Open this file in a text editor like nano to modify the configuration.
Removing discovery
By default, Home Assistant runs a discovery action for finding and integrating existing devices. It finds my Sonos and SqueezeBox systems. I don’t want to integrate HA with these right now, so I have turned off discovery in the configuration.yaml file by commenting out the section:
# Discover some devices automatically
#discovery:
Configuring an MQTT broker to use
My first custom configuration is to make HA listen to my existing MQTT topics. To achieve this I first have to configure HA to use my MQTT broker (Home Assistant can have its own broker but I already have mosquitto running on a separate Raspberry Pi):
mqtt:
  broker: 192.168.1.16
  port: 1883
  client_id: home-assistant-1
  keepalive: 60
If you have other settings needed for the broker, you can define them according to:
https://home-assistant.io/components/mqtt/
Configuring MQTT sensors
For an introduction to my MQTT setup, see these posts:
A self-hosted MQTT environment for Internet of Things – Part 1
A self-hosted MQTT environment for Internet of Things – Part 2
A self-hosted MQTT environment for Internet of Things – Part 3
HA’s mqtt sensor platform allows you to add subscriptions to sensor values/messages published on specific topics:
https://home-assistant.io/components/sensor.mqtt/
My first sensor setup looks like this:
This file contains hidden or bidirectional Unicode text that may be interpreted or compiled differently than what appears below. To review, open the file in an editor that reveals hidden Unicode characters.
Learn more about bidirectional Unicode characters
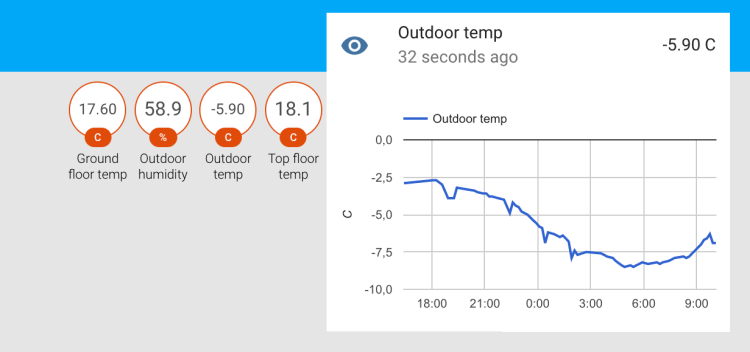
| sensor groundfloor: | |
| – platform: mqtt | |
| state_topic: "Home/GroundFloor/Temperature" | |
| name: 'Ground floor temp' | |
| unit_of_measurement: "C" | |
| sensor outdoor: | |
| – platform: mqtt | |
| state_topic: "Home/Outdoor/Temperature" | |
| name: 'Outdoor temp' | |
| unit_of_measurement: "C" | |
| – platform: mqtt | |
| state_topic: "Home/Outdoor/Humidity" | |
| name: 'Outdoor humidity' | |
| unit_of_measurement: "%" | |
| sensor topfloor: | |
| – platform: mqtt | |
| state_topic: "Home/TopFloor/Temperature" | |
| name: 'Top floor temp' | |
| unit_of_measurement: "C" |
With these sensor configurations in place, I get four sensor widgets in my Home Assistant GUI. To view historical data (1 day), a widget can be clicked to show a graph.
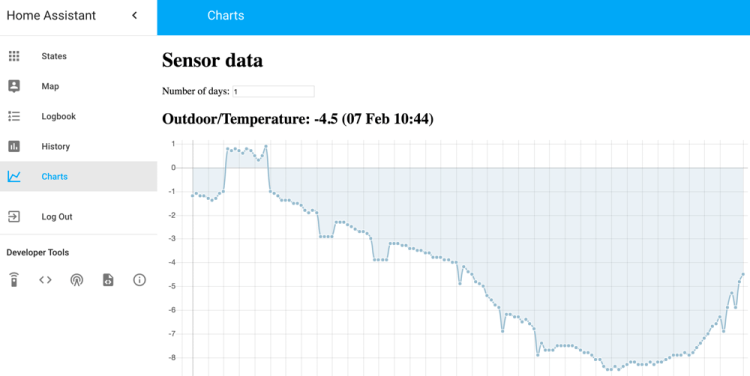
Integrating an existing web app with Home Assistant
I store all sensor data locally in a MongoDB database on a Raspberry Pi (gathered via an MQTT subscriber) and I have made a chart web app for viewing these data:
A web app for IoT data visualization
With Home Assistant’s panel_iframe configuration, it is possible to integrate a command that inlines this web app in the Home Assistant’s GUI:
This file contains hidden or bidirectional Unicode text that may be interpreted or compiled differently than what appears below. To review, open the file in an editor that reveals hidden Unicode characters.
Learn more about bidirectional Unicode characters
| panel_iframe: | |
| charts: | |
| title: 'Charts' | |
| url: 'http://192.168.1.16:6001/ChartData' | |
| icon: 'mdi:chart-line' |
With this configuration, there will be a new command in the menu that shows the web app in the main view:
Conclusions
I’ve just started getting to know Home Assistant and I will continue integrating more of my existing devices and services while learning more about this great platform. Next up is the integration of my service for remote controlled 433 MHz power outlets.
So far, this is my verdict for Home Assistant:
- Great instructions on installation and configuration! Some components could have more examples to be easier to get started with, though.
- It works great on a Raspberry Pi.
- Very good front-end! It is responsive and works well on mobile devices with small screens.
- The default-generated GUI is not very nice, but with a few tweaks with group and customize, you can get a ok user experience.
- The Logbook and History are very clearly laid out and lets you examine events and measurements in the past in an easy way.
- Lots of built-in and community-developed components.
- Does not force you into one “hub”-system. Home Assistant lets you integrate with your existing systems and services.
- You can build your own components in Python.
- With Home Assistant’s API it is possible to make your own front-end.
- It is self-hosted – you manage your own data. Love that.

Hi Lars. Thank you for this article. It kind of makes me think I’m on the right path. I’ve been working with HA for the last 6 months or so and have not been all that successful. Right now all it does is give me the weather and turn my outdoor lights on and off to the sun. That’s one Pi3 running stand alone. In that config.yaml it has the MQTT broker on localhost 127.0.0.1.
I have another Pi3 with a piface plus hat that is running mosquitto MQTT and I would like to have HA turn on and off the 4 relays on timed events.
Can you tell me how to get the MQTT connection between the two Pi3’s?
Thank you for any info!
LikeLike
Hi Rick! I would use one common mosquitto instance for both PI’s. It doesn’t matter which computer hosts it as long as both PI’s can access it on the same network. With the PI’s using the same MQTT broker, they will be able to exchange MQTT messages. If you define MQTT Switches in HomeAssistant with topics for each relay, then the PI with the relays can subscribe to these topics (and the on/off events can be automated in HomeAssistant). It is possible to bridge two MQTT brokers (as explained in this post (https://larsbergqvist.wordpress.com/2017/04/02/owntracks-mosquitto-and-home-assistant/), but if you can use one single broker it is much easier.
(I have not used PiFace relays so I don’t know if there are any intricate details for controlling the relays from e.g. a Python script that uses an MQTT library).
I hope this helps!
LikeLike
Hi,
Thank you for nice posts. I am really enjoying reading your posts. There is one question about IoT platform such as Home assistant you used in this post. I am hesitating between Thinger.IO and Home assistant. Do you have any opinion about those platforms?
Thanks
LikeLike
Hi Sangmin! I have not tested Thinger.IO (yet, but I might have to check it out, nice tip!). When I evaluated Home Assistant I compared it mainly to OpenHAB and Domoticz and I found Home Assistant to be the most easy-to-use platform for my needs.
LikeLike
Hello mate nice poost
LikeLike